Unlocking the Potential of the TIDRADIO TD H8: Custom Firmware by Nicsure
Introduction
The TIDRADIO TD H8, a popular model among radio enthusiasts, has just become even more versatile and user-friendly thanks to a custom firmware developed by Marcus, known in the community as Nicsure. This custom firmware builds upon the latest official firmware version 230923, introducing a range of new features designed to enhance the device’s functionality and user experience.
What’s New in the Custom Firmware?
Nicsure’s custom firmware introduces several significant improvements and new features:
- Three Types of Signal Bars:
- Solid Signal Bar: A continuous bar that provides a straightforward and easy-to-read display of signal strength.
- Segmented Signal Bar: This version breaks the signal bar into segments, offering a more detailed representation of signal strength fluctuations.
- S Meter Pro: A professional-grade signal meter that provides precise and detailed signal strength readings, ideal for advanced users who need more accurate information.
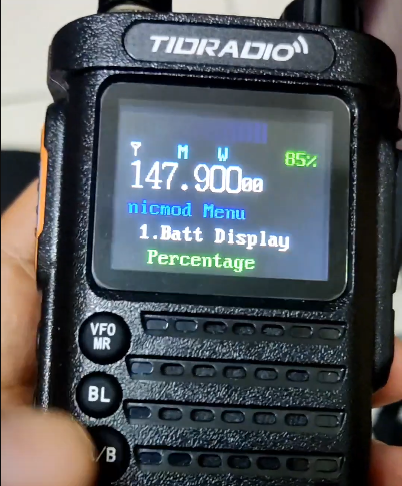
- Two Types of Battery Indicators:
- Percentage Indicator: Displays the battery level as a percentage, offering a clear and precise understanding of remaining battery life.
- Icon Indicator: A traditional battery icon that changes to show different levels of battery charge, providing a quick visual reference.
- Frequency Adjustment:
- Users can fine-tune their frequency settings within a range of +64 MHz to -200 MHz, ensuring optimal performance and better communication clarity.
- Signal Bar Calibration:
- Users can now calibrate the signal bar to match their specific requirements and preferences, enhancing the accuracy and usefulness of the signal strength display.
How to Install the Custom Firmware
Installing the custom firmware on your TIDRADIO TD H8 is a straightforward process. To get started, follow these steps:
- Download the Firmware:
- Visit the official GitHub repository at Nicsure’s TD-H8 Engineering to download the custom firmware files.
- Prepare Your Device:
- Ensure your TD H8 is fully charged and connected to your computer via programming cable.
- Install the Firmware:
- Follow the detailed installation instructions provided in the repository. This typically involves running a firmware update tool and selecting the custom firmware file.
- Restart and Enjoy:
- Once the installation is complete, restart your device and explore the new features and enhancements.
Why Choose Nicsure’s Custom Firmware?
Nicsure’s custom firmware is a testament to the power of community-driven innovation. By addressing the needs and preferences of radio enthusiasts, Marcus has created a more versatile and user-friendly firmware that adds significant value to the TIDRADIO TD H8.
Whether you’re a seasoned radio operator or a newcomer to the hobby, this custom firmware offers improvements that can enhance your experience. The added features provide greater control over your device’s performance, allowing you to tailor it to your specific needs.
Conclusion
The TIDRADIO TD H8 is already a reliable and popular choice among radio enthusiasts, and with Nicsure’s custom firmware, it becomes even more powerful. By adding new signal bars, battery indicators, frequency adjustment, and calibration options, this firmware enhances both the functionality and user experience of the TD H8.
To explore these exciting new features, download the custom firmware from Nicsure’s GitHub repository and follow the installation instructions. Unlock the full potential of your TIDRADIO TD H8 and take your radio communication to the next level.
For more information and to download the firmware, visit Nicsure’s TD-H8 Engineering on GitHub.


15 comments