amateur radio
DIY
do it yourself
electrical
ham radio
home improvement
radio amatur
radio shack
wiring
#ACVoltage, #amateuradio, #DIYElectrical, #electricaldiagnosis, #ElectricalSafety, #ElectricalTesting, #electricaltroubleshooting, #Grounding, #groundingsystem, #HamRadio, #hamradioequipment, #HomeElectrical, #Multimeter, #nonconductive, #powercheck, #radiogear, #radiosafety, #radioshack, #safeelectrical, #voltagereading, #voltagestability
9M2PJU
0 Comments
How to Safely Check Your Home’s Electrical System with a Multimeter – And Why It Matters for Your Amateur Radio Shack
If you’ve ever wondered whether your home’s electrical system is working properly, or if you’ve been experiencing unusual power issues, using a multimeter can help you diagnose potential problems quickly and safely. This essential tool is used to measure voltage, current, and resistance in electrical circuits, making it an indispensable device for both professionals and DIY enthusiasts. For amateur radio operators, ensuring your home electrical system is in top shape is especially important. The amateur radio shack—where your radio equipment, antennas, and power supplies are set up—relies heavily on the stability and reliability of your electrical system. Issues like unsteady power supply, improper grounding, or voltage fluctuations can negatively impact your equipment’s performance, potentially causing interference or even damaging sensitive gear. In this post, I’ll guide you through the process of using a multimeter to check key parts of your home’s electrical system—specifically the Live (L), Neutral (N), and Earth (E) connections—and explain why these checks are vital for the safe operation of both your home and your amateur radio setup.
What You Need:
- Multimeter (digital or analog)
- Safety gloves (optional, but recommended for extra precaution)
- Safety glasses (optional, for additional protection)
- A working electrical system (obviously!)
Safety First
Before we dive into the how-to, let’s talk about safety. Electricity is dangerous, and even a simple tool like a multimeter can be hazardous if not used properly. Here are some safety tips:
- Ensure the power is off when working on circuits, unless you are measuring live voltage.
- Wear insulated gloves and use tools with insulated handles when working near live electrical components.
- Check your multimeter’s settings before you start measuring to avoid damage or injury.
- Avoid touching the metal parts of the probes while they are connected to the circuit.
Step-by-Step Guide to Using a Multimeter for Electrical Work
1. Set Your Multimeter to Measure AC Voltage
First, you’ll want to set your multimeter to measure AC voltage (alternating current). Most home electrical systems use AC, so this is the setting you’ll need most often.
- Turn the dial on your multimeter to AC voltage, which is typically marked with a “V” and a tilde (~) symbol, indicating AC voltage.
- Choose the correct voltage range. If you’re unsure, set it to a higher range (e.g., 200V or 600V) so the multimeter automatically adjusts to the correct reading.
2. Test the Voltage Between Live (L) and Neutral (N)
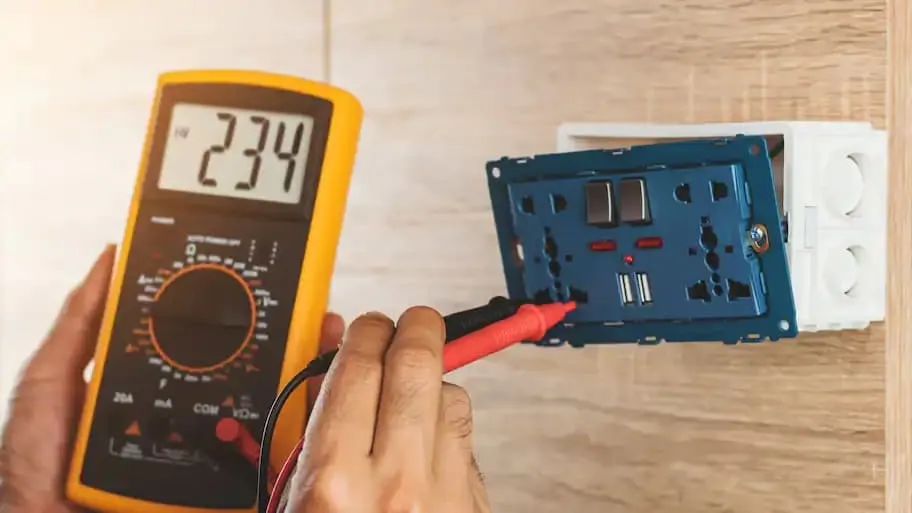
The most common and basic test is checking the voltage between the Live (L) and Neutral (N) terminals in an electrical outlet.
- Insert the probes: The black probe goes into the common (COM) port of the multimeter, and the red probe goes into the voltage (V) port.
- Place one probe on the Live (L) terminal and the other on the Neutral (N) terminal of the outlet.
What Should You See?
- A typical voltage reading will be around 110V-120V (in the US) or 220V-240V (in many other countries), depending on where you live.
- If you get a zero or very low reading, this could indicate a problem with your electrical supply or wiring.
3. Test Between Live (L) and Earth (E)
Next, you’ll want to test the connection between the Live (L) and Earth (E) (also known as grounding). Proper grounding is essential for safety, and this test helps ensure the grounding system is intact.
- Place one probe on Live (L) and the other on the Earth (E) (or the metal ground connection in your outlet or electrical panel).
What Should You See?
- You should see the same voltage reading as between Live (L) and Neutral (N) (around 120V or 230V).
- If the reading is much lower than expected, this could indicate that the ground is not properly connected, which can be a serious safety hazard.
4. Test Between Neutral (N) and Earth (E)
The last check you can perform is between Neutral (N) and Earth (E). This test ensures that the neutral wire is properly grounded.
- Place one probe on Neutral (N) and the other on Earth (E).
What Should You See?
- Ideally, you should see 0V or very close to 0V, as there shouldn’t be a significant voltage difference between neutral and ground.
- A small voltage (less than 5V) is usually normal and can be due to minor voltage differences in the system, but anything much higher suggests a problem with your grounding or neutral wiring.
Why These Tests Matter for Your Amateur Radio Shack
For amateur radio enthusiasts, the quality of your home electrical system can significantly affect the performance of your radio equipment. Here’s how:
- Voltage Stability: Amateur radio gear requires a stable power supply. Voltage fluctuations or irregularities can cause interference, distorted signals, and even damage to your radio equipment. By checking the voltage between Live and Neutral (L-N), you’re ensuring that your power supply is consistent and reliable.
- Proper Grounding (L-E and N-E): Grounding is crucial in both electrical safety and radio signal quality. If your radio equipment isn’t properly grounded, you could experience RF interference or other performance issues. A poor grounding system can also lead to shock hazards. By measuring between Live to Earth (L-E) and Neutral to Earth (N-E), you can ensure your grounding is intact and your setup is safe for both you and your equipment.
- Safety for Radio Equipment: Properly grounded electrical systems protect your equipment from electrical surges or faults. If there’s an issue with your grounding (for example, if you see a high voltage between Neutral and Earth), it can lead to the failure of your power supply or damage to sensitive components of your radio shack.
When Should You Call an Electrician?
While a multimeter is a powerful tool, it has its limits. If you notice any of the following, it’s best to call in a professional:
- Voltage readings are significantly different from expected (e.g., no voltage or too high).
- You encounter electrical buzzing, sparking, or odors around outlets or switches.
- There’s no voltage between Live (L) and Neutral (N), or no proper grounding between Earth (E) and Neutral (N).
For amateur radio setups, it’s especially important to get your electrical system inspected regularly to ensure that your equipment operates smoothly without interference from faulty wiring or grounding issues.
Final Thoughts
Using a multimeter to check your home’s electrical system is an easy and effective way to ensure everything is running smoothly. For amateur radio enthusiasts, ensuring that your electrical system is stable and properly grounded is essential not just for safety but also for the optimal performance of your equipment. Regular checks with a multimeter can help prevent issues like electrical interference, equipment damage, and safety hazards. By following these simple steps, you can perform a quick check on your electrical system, ensuring that both your home and amateur radio shack are safe, efficient, and ready for operation.


Post Comment