DIY
do it yourself
electrical
home brew
home improvement
lighting
wiring
#3WaySwitch, #DIYElectrical, #DIYWiring, #ElectricalDIY, #ElectricalInstallations, #ElectricalProjects, #ElectricalRepairs, #ElectricalSafety, #ElectricalTips, #HomeAutomation, #HomeImprovement, #HomeLighting, #HomeRenovation, #HowToWire, #IntermediateSwitch, #LampWiring, #LightingControl, #LightingSolutions, #SmartHome, #SwitchWiring, #WiringGuide
9M2PJU
0 Comments
How to Wire an Intermediate Switch for a Lamp: A Simple Guide for DIY Enthusiasts
If you’re looking to improve your home’s lighting setup or embark on a DIY electrical project, wiring an intermediate switch for a lamp can be a very rewarding task. This type of setup allows you to control the same light from multiple locations, which is especially handy in larger rooms, hallways, or staircases. In this blog post, we’ll walk you through the process of wiring an intermediate switch for a lamp, explaining each step in a simple and clear way.
What is an Intermediate Switch?
Before we get into the wiring process, let’s first define what an intermediate switch is and how it differs from the standard on/off switch. An intermediate switch is often used in a multi-way switching circuit (commonly known as a 3-way or 4-way switch) to control a light from more than two locations. If you have two or more switches controlling the same lamp, you’ll need an intermediate switch between them to allow for more control.
You might encounter these setups in staircases (to control the light from both the top and bottom) or in long hallways (to turn the light on from one end and off from another).
What You’ll Need
Before starting the project, gather all the necessary tools and materials:
- Intermediate switch
- Two 3-way switches
- A lamp (or light fixture)
- Electrical wire (live, neutral, and earth wires)
- Screwdrivers
- Wire strippers
- Electrical tape
- A voltage tester
- A power drill (if necessary)
- A screwdriver
Once you’ve gathered everything, you’re ready to get started!
Step-by-Step Guide to Wiring an Intermediate Switch for a Lamp
1. Turn Off the Power
First and foremost, safety is crucial. Make sure to turn off the power at the circuit breaker to avoid any electrical accidents. Use a voltage tester to confirm that the wires are not live before you begin.
2. Understand the Components
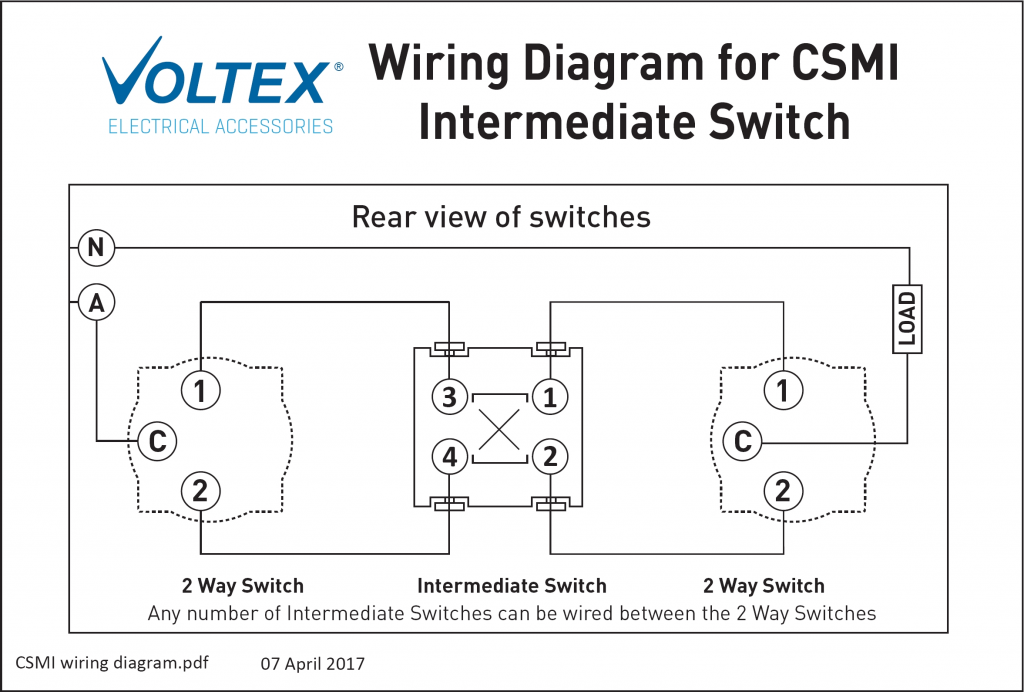
There are three switches involved in this setup:
- Switch 1 and Switch 3: These are standard 3-way switches that control the light from two locations.
- Intermediate Switch: This switch is placed between Switch 1 and Switch 3. It allows the circuit to have multiple control points for the same light.
Each of these switches has a common terminal (where the live wire connects) and two traveler terminals (for the traveler wires that carry the current between the switches).
3. Wiring the Switches
- Wiring the Common Terminal of Switch 1: Connect the live wire (often marked as red or brown) from your electrical panel to the common terminal of Switch 1. This wire is the “incoming live” that powers the entire circuit.
- Wiring the Traveler Wires: Use two traveler wires (usually black or blue) to connect the traveler terminals of Switch 1 to the traveler terminals of the intermediate switch (Switch 2). These wires will carry the current to and from the intermediate switch.
- Wiring the Intermediate Switch (Switch 2): Connect the two traveler wires from Switch 1 to the traveler terminals on the intermediate switch. The intermediate switch doesn’t have a “common” terminal but simply swaps the connections of the traveler wires. The intermediate switch can either “swap” or “uncross” the wires, altering the flow of current.
- Wiring the Common Terminal of Switch 3: The second 3-way switch (Switch 3) connects the outgoing live wire (also red or brown) to the common terminal of Switch 3. This is the wire that leads to the lamp.

4. Connecting the Lamp
Now that the switches are wired, it’s time to connect your lamp:
- Connect the live wire (from the common terminal of Switch 3) to the live terminal of the lamp.
- Connect the neutral wire (typically blue) from the electrical supply directly to the neutral terminal of the lamp.
- Finally, connect the earth wire (green/yellow) from the circuit to the lamp’s earth terminal (if required for safety).
5. Check the Connections
Double-check all your connections, ensuring each wire is tightly secured, and no loose strands are exposed. For added safety, wrap any exposed wires with electrical tape.
6. Test the Circuit
Once everything is wired, it’s time to turn the power back on at the circuit breaker. Test the circuit by flipping the switches and seeing if the lamp turns on and off from all switch locations. If everything is wired correctly, your intermediate switch system should be functioning perfectly!
Final Tips
- Label Wires: As you work, labeling your wires with tape or markers can help you avoid confusion, especially when dealing with multiple travelers.
- Use the Right Tools: Invest in quality wire strippers and screwdrivers to make sure your wiring is neat and secure.
- Consult a Professional: If you’re uncertain about any part of the wiring process, it’s always a good idea to consult a qualified electrician. Electricity is dangerous, and it’s better to be safe than sorry!
Conclusion
Wiring an intermediate switch for a lamp is a practical and useful project that can save you time and effort in the long run. By following these steps and understanding how the switches interact with one another, you’ll be able to control your light from multiple locations in your home. Whether it’s for a staircase, hallway, or large room, adding this kind of flexibility to your lighting setup is a valuable upgrade.
So, go ahead, grab your tools, and take on this project with confidence – with a little patience and care, you’ll have a new, multi-location lighting control system that’ll make your home more convenient and efficient!


Post Comment