amateur radio
debian
fedora
free open source software
ham clock
ham radio
installation
raspberry pi
ubuntu
AmateurRadio, debian, DXCluster, dxing, fedora, freebsd, ham radio clock, hamclock, hamradio, linux, macos, netbsd, propagation, radioastronomy, radiowave, RaspberryPi, satellite, shortwave, ubuntu
9M2PJU
5 Comments
Installing HamClock for Amateur Radio Use
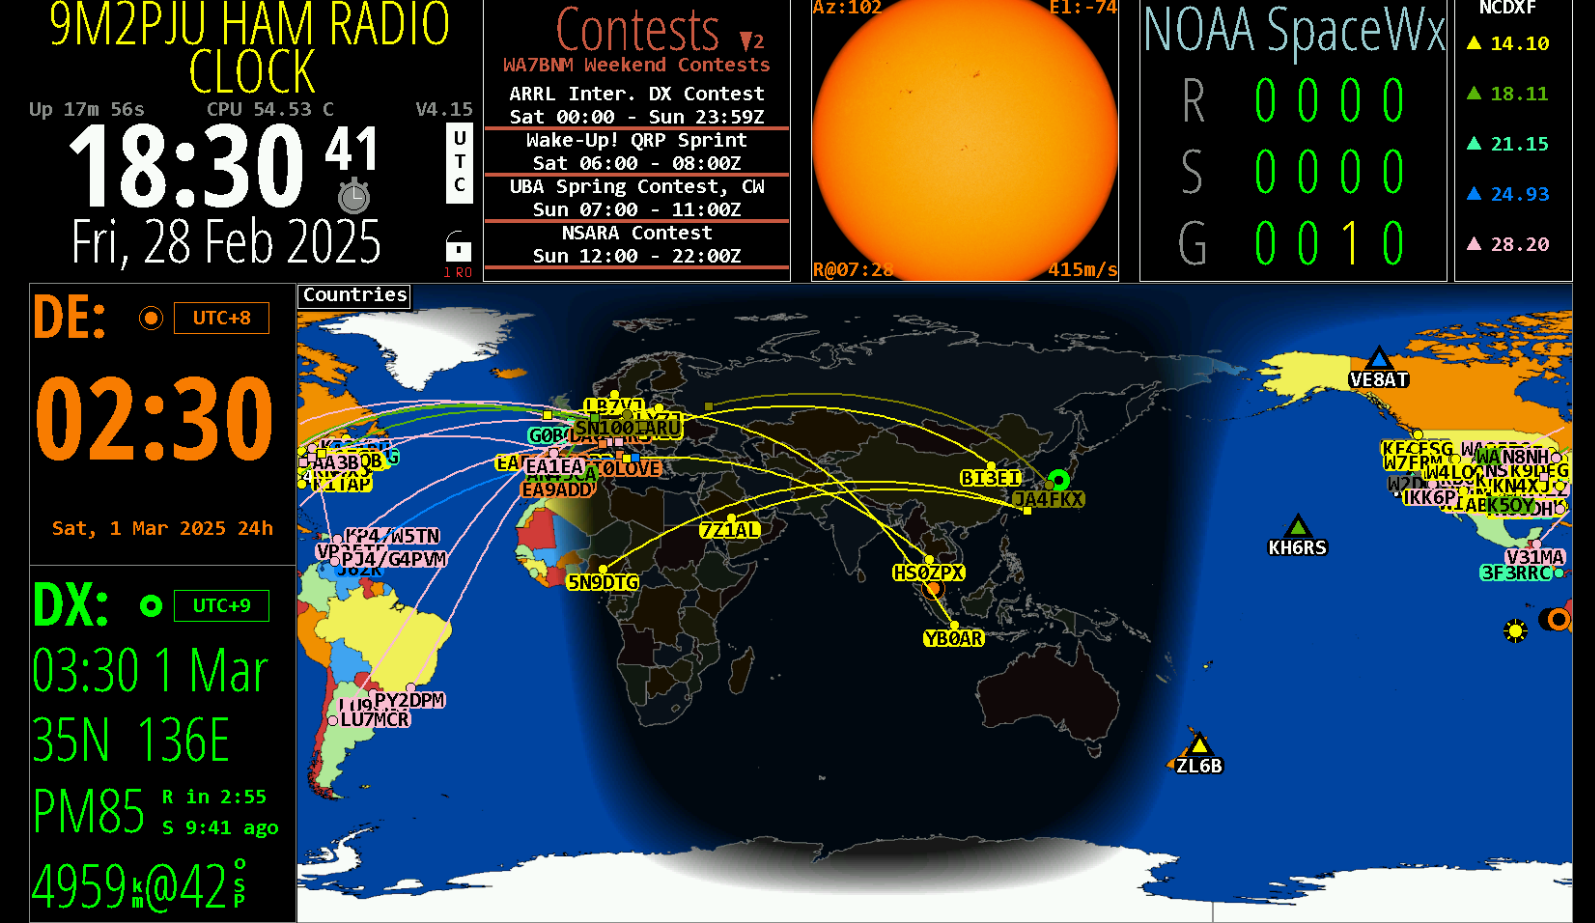
HamClock is a powerful tool designed for amateur radio operators, providing real-time propagation data, satellite tracking, and more. This guide will walk you through installing HamClock on various UNIX-like systems, including Raspberry Pi, macOS, Debian, Ubuntu, FreeBSD, and others. Whether you’re using HamClock for monitoring solar conditions, DX cluster spots, or tracking satellites, this step-by-step tutorial will help you get started.
Step 1: Install Required Dependencies
Before installing HamClock, ensure your system has the necessary dependencies installed. These dependencies vary by operating system:
For Raspberry Pi and Debian-based Systems:
sudo apt-get update
sudo apt-get -y install curl make g++ libx11-dev libgpiod-dev xdg-utils
For Ubuntu:
sudo apt install curl make g++ xorg-dev xdg-utils
For macOS:
First, install XQuartz and Xcode. Then, open “More developer tools” and install the command line tools. On macOS Sequoia, you may need to run:
xcode-select --install
For FreeBSD:
sudo pkg install gcc xorg gmake curl
Then, use gmake instead of make.
For NetBSD:
First, install pkgin, then run:
sudo pkgin install gmake curl
Use gmake instead of make.
For RedHat or Fedora:
sudo yum install gcc-c++ libX11-devel xdg-utils
For Alpine Linux:
setup-desktop
apk add g++ libx11-dev curl linux-headers
Step 2: Install HamClock
Once the dependencies are installed, proceed with downloading and installing HamClock. There are two methods depending on your operating system.
For Raspberry Pi (Automated Install):
cd
curl -O https://www.clearskyinstitute.com/ham/HamClock/install-hc-rpi
chmod u+x install-hc-rpi
./install-hc-rpi
Follow the prompts and answer y or n as needed. This script will automate the installation for you.
For Other UNIX-like Systems (Manual Install):
cd
rm -fr ESPHamClock
curl -O https://www.clearskyinstitute.com/ham/HamClock/ESPHamClock.zip
unzip ESPHamClock.zip
cd ESPHamClock
make -j 4 hamclock-800x480
sudo make install
This will install HamClock with a resolution of 800×480 pixels. If you need a different resolution, refer to Step 4.
Step 3: Run HamClock
After installation, you can start HamClock with the following command:
hamclock &
If everything is installed correctly, HamClock should open in a window displaying solar data, propagation info, and maps.
If you did not install a desktop icon, you can always launch HamClock from the terminal using the command above.
Step 4: Customize HamClock
HamClock supports different screen sizes. If you want to change the resolution, use the following commands:
cd ~/ESPHamClock
make clean
make -j 4 hamclock-2400x1440
sudo make install
Replace 2400x1440 with the desired resolution:
hamclock-1600x960hamclock-2400x1440hamclock-3200x1920
If you want HamClock to fill the screen completely, navigate to Page 5 in the Setup menu and enable the full-screen option.
Step 5: Auto-start HamClock on Boot
To ensure HamClock starts automatically on system boot, you can create an autostart entry.
For XDG-compliant systems:
cd ~/ESPHamClock
mkdir -p ~/.config/autostart
cp hamclock.desktop ~/.config/autostart
For macOS (Create a Clickable App):
If you’re using macOS, you can create a clickable app on your Desktop:
cd ~/ESPHamClock
HCDIR=~/Desktop/HamClock.app
mkdir -p $HCDIR
echo '#!/bin/bash' > $HCDIR/HamClock
echo '/usr/local/bin/hamclock &' >> $HCDIR/HamClock
chmod u+x $HCDIR/HamClock
To assign a proper icon, follow these steps:
- Open
hamclock.pngwith Preview. - Click on the image.
- Press ⌘-A to select the image, then ⌘-C to copy.
- Right-click the new
HamClock.appDesktop item and select Get Info. - Click the existing default icon in the top left corner.
- Press ⌘-V to paste the new icon.
Conclusion
By following these steps, you’ll have HamClock running seamlessly for amateur radio use, helping you track propagation, monitor DX cluster spots, and track satellites. Whether you’re using a Raspberry Pi, macOS, or a UNIX-like system, HamClock is a great addition to any ham radio station. For more info, visit https://www.clearskyinstitute.com/ham/HamClock/
Enjoy using HamClock and 73! 🎙️📡


5 comments