amateur radio
DIY
do it yourself
maintenance
radio repair
tips and tricks
amateur radio, antenna tuning, DIY electronics, electronics repair, ham equipment, ham radio, radio diagnostics, radio maintenance, radio repair, RF troubleshooting, SWR measurement, technical skills, transceiver troubleshooting
9M2PJU
0 Comments
How to Do Basic Repair for Amateur Radio Transceivers
Amateur radio transceivers open up a world of communication, but like all electronics, they sometimes need a little care to keep working smoothly. Before sending your rig for costly repairs, you can try some basic troubleshooting and simple fixes yourself.
Here’s a comprehensive guide to help you perform basic repair and maintenance on your amateur radio transceiver.
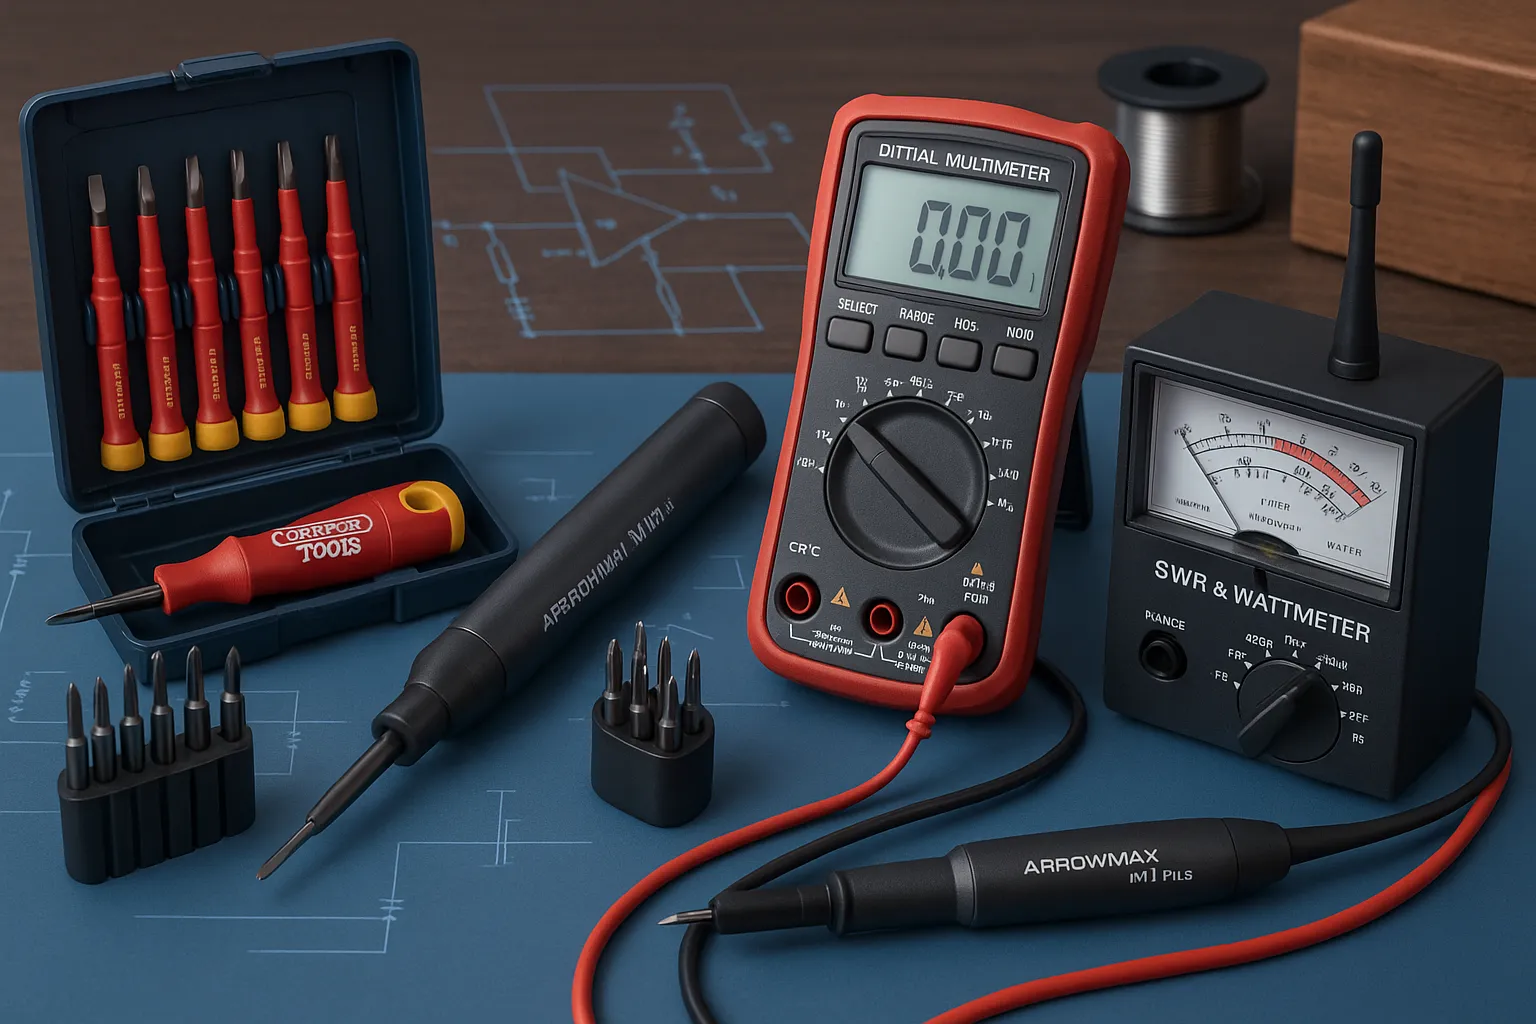
Essential Tools to Have on Hand
Before you start, having the right tools will make your life much easier:
- Multimeter: For checking voltages, continuity, and resistance. A digital multimeter with auto-ranging features is ideal.
- SWR Meter (Standing Wave Ratio meter): To test your antenna system and ensure efficient transmission.
- Contact Cleaner Spray: To clean switches, knobs, and connectors. Use electronic-grade cleaner that leaves no residue.
- Small Screwdriver Set: For opening the radio or adjusting screws. Both Phillips and flathead in various sizes.
- Spare Fuses: Radios often use small fuses that can blow. Keep a variety of ratings on hand.
- Extra Antenna or Coax Cable: To swap and isolate antenna problems.
- Anti-Static Wrist Strap: Prevents damage to sensitive components when working inside radios.
- Magnifying Glass: Helpful for inspecting circuit boards and tiny components.
- Needle-nose Pliers: For handling small parts and connectors.
- Tweezers: For precise handling of tiny components.
Step 1: Visual Inspection
Begin by carefully inspecting your radio:
- Look for any physical damage like cracked knobs, broken connectors, or water damage signs.
- Check the antenna connector for corrosion, looseness, or bent center pins.
- Inspect the power cable, battery contacts, and fuse holders for dirt, corrosion, or loose connections.
- Examine circuit boards (if accessible) for browning, burn marks, or swollen capacitors.
- Look for loose objects inside the radio that might cause shorts.
Step 2: Power Check with a Multimeter
Power issues are extremely common in amateur radios:
- Use the multimeter to check the voltage coming from your power source or battery.
- Make sure it matches the radio’s required voltage (typically 12-14V DC for base stations, 7.2-12V for handhelds).
- Check the fuse in the radio or power supply with the multimeter’s continuity mode; replace if blown.
- Test power at the radio’s power input jack to ensure power is actually reaching the radio.
- Check for voltage drop when transmitting, which could indicate an undersized power supply.
- Inspect battery packs for corrosion, bulging, or leakage if using portable equipment.
Step 3: Test the Antenna System with an SWR Meter
A poor antenna connection can cause your radio to transmit weakly or not at all:
- Connect your SWR meter between your radio and antenna.
- Transmit a test signal (with low power) and observe the SWR reading.
- A high SWR (above 2:1) indicates antenna or cable problems; try swapping the antenna or cable.
Interpreting SWR Readings:
- 1:1 to 1.5:1: Excellent – your antenna system is working well.
- 1.5:1 to 2:1: Good – acceptable for normal operation.
- 2:1 to 3:1: Marginal – usable but inefficient, may cause radio to reduce power.
- Above 3:1: Poor – can damage your radio’s finals. Fix before transmitting at high power.
Common Antenna System Problems:
- High SWR across all frequencies: Likely a broken antenna or cable.
- SWR varies with frequency: Possibly incorrect antenna length or tuning issues.
- Intermittent SWR changes: Look for loose connections or water ingress.
- Normal SWR but poor performance: Check for cable loss or environmental RF noise.
Step 4: Check Audio Components
Make sure your radio’s audio system is working:
- Listen through the internal speaker or plug in headphones/external speaker.
- Test the microphone and Push-To-Talk (PTT) button.
- Use contact cleaner on volume knobs, squelch controls, and mic connectors to clear oxidation.
- Check for audio distortion which might indicate problems with the audio amplifier circuit.
- Test receive audio by tuning to a known active frequency or using a signal generator.
- Verify transmit audio by conducting a test transmission with another operator.
Advanced Audio Troubleshooting:
- Scratchy audio when adjusting controls: Clean potentiometers with contact cleaner.
- Intermittent audio: Check for loose connections or cold solder joints.
- Low audio: Check speaker impedance matches radio requirements.
- Distorted transmit audio: Test microphone element or adjust mic gain settings.
Step 5: Reset and Reprogram
If your radio behaves oddly, it might just be a settings issue:
- Perform a factory reset using your radio’s manual instructions.
- Note: This will erase all memory channels and custom settings.
- Reprogram memory channels using the radio or programming software.
- Check menu settings that might affect performance (filter widths, power levels, squelch settings).
- Update firmware if available from the manufacturer.
Step 6: Clean Connectors and Controls
Dirt and oxidation can cause intermittent issues:
- Spray contact cleaner into jacks, switches, and rotary controls.
- Rotate knobs and toggle switches several times to loosen grime.
- Clean microphone connectors and check for bent pins.
- Remove and clean battery contacts with a pencil eraser or contact cleaner.
- Inspect and clean antenna connectors – oxidized PL-259 connectors are a common issue.
Step 7: Safely Opening Your Radio
When external troubleshooting doesn’t resolve the issue:
- Disconnect all power sources including batteries before opening.
- Work on a clean, static-free surface and wear an anti-static wrist strap.
- Take photos of internal components before removing anything.
- Document where each screw belongs – they often have different lengths.
- Be careful with ribbon cables and connectors – they’re fragile.
- Look for obvious problems like loose connections, burned components, or corrosion.
- Check for leaking or bulging capacitors which often cause issues in older radios.
Step 8: Component-Level Testing
For more advanced users with some electronics knowledge:
- Check transistors and diodes with a multimeter’s diode test function.
- Test capacitors for proper capacitance and ESR (with specialized equipment).
- Look for cold solder joints which appear dull or cracked.
- Test crystal oscillators for proper frequency (requires frequency counter).
- Check voltage regulators for correct output.
Common Issues by Radio Type
HF Transceivers:
- Frequency drift: Often caused by aging oscillator components or temperature issues.
- Low output power: Check final amplifier transistors and driver stages.
- Poor receiver sensitivity: Look for front-end issues or filter problems.
VHF/UHF Mobile Radios:
- Intermittent transmit/receive: Often connection issues at power or antenna.
- Overheating: Check mounting location and ventilation.
- Display problems: Cold solder joints on display boards are common.
Handheld Transceivers:
- Battery drain: Check for stuck PTT button or component shorts.
- Weak transmission: Often antenna connector issues or battery problems.
- Water damage: Common issue requiring thorough internal cleaning and drying.
When to Move Beyond Basic Repairs
If these steps don’t fix your radio, the issue may lie deeper inside the circuitry:
- Issues requiring specialized test equipment (oscilloscopes, spectrum analyzers)
- Problems with surface-mount components
- Damage to multilayer circuit boards
- Issues with custom integrated circuits or microprocessors
- Burned RF power amplifier components
- Digital signal processing failures
These problems usually require professional repair with specialized equipment and expertise.
Emergency Fixes for Field Operation
Sometimes you need temporary solutions when operating away from home:
- Intermittent connections: Use aluminum foil to temporarily reinforce loose battery contacts.
- Broken antenna: Create an emergency wire antenna of appropriate length.
- Power issues: Use jumper cables to connect directly to a car battery (with fuse protection).
- Audio problems: Use external speaker/mic as a workaround for internal audio issues.
Preventative Maintenance
Keep your radio in top condition with regular maintenance:
- Clean dust from vents and fans every few months.
- Check and clean all connectors at least twice a year.
- Inspect antennas and coax for weather damage seasonally.
- Test SWR before major operating events.
- Update firmware when manufacturers release new versions.
- Exercise all controls regularly to prevent oxidation buildup.
- Store with batteries removed if not used for extended periods.
Final Words
With these tools and techniques, you can troubleshoot many common radio problems yourself. This not only saves money but also deepens your understanding of your rig and radio fundamentals. When problems exceed your comfort level or available tools, don’t hesitate to seek professional repair – sometimes paying an expert is the most economical solution in the long run.
Amateur radio is as much about learning and technical skill as it is about communication. Each repair challenge is an opportunity to learn more about your equipment and the fascinating world of radio electronics.


Post Comment