ad blocker
DIY
do it yourself
embedded
esp32
home networking
open source
ad blocker wifi device, adafruit esp32-s2, adaway host file, arduino dns server, block ads esp32, circuitpython dns blocker, diy ad blocker, dns sinkhole, esp32 adblocker, esp32 dns server, esp32-s2 projects, esphole ad blocker, esphole uf2, feather esp32-s2 blocker, feather tft esp32, iot privacy project, nah to ads project, network-wide ad blocking, open source adblocker, pi-hole alternative
9M2PJU
0 Comments
ESPHole: A Compact DIY DNS Ad Blocker
Tired of banner ads, pop-ups, and invisible trackers cluttering your web experience? Meet ESPHole — a clever and compact DNS-based ad blocker powered by the Adafruit ESP32-S2 TFT Feather. Inspired by Pi-hole, but built for today’s hardware shortages and maker-friendly tools, ESPHole gives you an easy way to reclaim your digital space — with a satisfying “Nah!” to intrusive ads.
What is ESPHole?
ESPHole is a mini DNS sinkhole server that blocks ad domains at the network level. It works by redirecting known ad-serving and tracking domains to nowhere (0.0.0.0), effectively stopping unwanted content before it even reaches your device. Instead of relying on browser extensions or Pi-based setups, ESPHole offers a simpler and more accessible solution for anyone with an ESP32-S2 board.
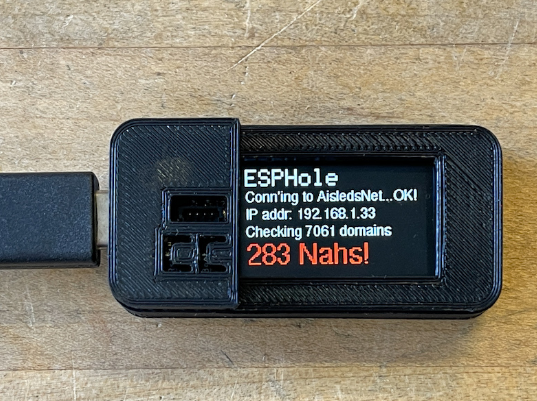
And best of all — it shows you exactly how many ad requests it blocks right on the TFT screen.
Why Use ESPHole?
- ✅ Blocks Ads Network-Wide
Once set as your DNS server, ESPHole stops ads on all connected devices — phones, tablets, laptops, even smart TVs. - ✅ Visual Feedback
The built-in display shows the current IP address, status, and how many times it’s said “Nah!” to ad domains. - ✅ Easy to Build and Flash
No advanced networking required. Just flash the firmware, add your Wi-Fi credentials, and you’re ready to go. - ✅ Open Source and Customizable
ESPHole is based on a community project by rubfi and customized by John Park for the Adafruit Feather platform. You can modify the host list, UI, or even case design as you like.
How It Works
After flashing the ESPHole firmware and adding your Wi-Fi credentials via a simple secrets.json file, the device connects to your network and downloads a host list of domains to block (such as AdAway’s). You then point your device’s DNS settings to ESPHole’s IP address (e.g., 192.168.1.33) — and that’s it.
You’ve built your own ad blocker.
What You Need
- Adafruit ESP32-S2 TFT Feather (Product ID: 5300)
- USB Type-A to USB-C Cable
- Optionally: A 3D printed case for a tidy enclosure (Download here)
Setup in a Nutshell
- Create a File System: Flash CircuitPython to the board to create an accessible USB drive.
- Add Wi-Fi Credentials: Create and save a
secrets.jsonwith your SSID and password. - Flash ESPHole Firmware: Drag the precompiled UF2 firmware file onto the board.
- Set ESPHole as DNS: Point your devices’ DNS settings to the ESPHole’s IP.
Mobile & Desktop Compatible
- On iOS, it’s a breeze — just go to Wi-Fi > Configure DNS > Manual and type in the ESPHole’s IP.
- On Android, go to your Wi-Fi settings > Advanced > IP Settings > Static, and set DNS1 to ESPHole’s IP.
- On PC/Mac, you can update your DNS settings in network configuration.
Clean, Fast Browsing Experience
Once ESPHole is active, sites will load faster, feel cleaner, and your privacy is better protected — without needing browser plugins or subscriptions. It’s a tangible, transparent way to control your network.
And yes — it’s incredibly satisfying watching the “Nah!” counter tick up with every blocked ad.
Get Started
You can find the full guide and source code here:
🔗 ESPHole on Adafruit Learn
Whether you’re into DIY electronics, network privacy, or just want a fun weekend project that actually makes your browsing experience better — ESPHole is worth a try.
Reference: https://cdn-learn.adafruit.com/downloads/pdf/esphole-ad-blocker.pdf


Post Comment