How to Pass Strong Integrity on Android
Passing Google’s Play Integrity checks can be a real challenge, especially if you’re running a rooted or modified device. Whether you’re trying to get banking apps working or just want full access to the Play Store, this guide walks you through everything you need to do to pass Basic Integrity, Device Integrity, and even the elusive Strong Integrity. This works with both the legacy and new Play Integrity response formats, so you’re fully covered.
Make sure to follow each step carefully. A small mistake can lead to integrity check failures.
🔧 Step 1: Remove Any Old Modules
Before doing anything, remove any previously installed Play Integrity-related modules. Mixing multiple modules or outdated versions can cause conflicts that break integrity responses. A clean slate is essential.
📥 Step 2: Get the Right Tools
You’ll need to download and install a few key components. Here’s what you’ll need:
Zygisk Module (choose one):
- ReZygisk — Recommended for most users. It’s stable and maintained.
- NeoZygisk — An alternative if ReZygisk doesn’t suit your setup.
Play Integrity Module (choose one):
- PlayIntegrityFix — This is the go-to module. It does a great job patching things up.
- PlayIntegrityFork — A forked version with some tweaks. Useful for specific setups.
Tricky Tools:
- TrickyStore — Helps disguise your device and patch key integrity points.
- Tricky Addon – Update Target List — Keeps your target list updated to improve success.
⚙️ Step 3: (Optional) Install KSU Web UI
If you’re using KernelSU (KSU) instead of Magisk, it helps to install a web-based interface. Pick one:
- KSU Web UI Standalone — Simple and direct interface.
- MMRL — A lightweight alternative with similar functionality.
🔄 Step 4: Reboot Your Device
After installing all necessary modules and tools, reboot your phone. This allows Zygisk and other changes to fully initialize.
🛠️ Step 5: Configure PlayIntegrityFix
Once you’re back in, do this:
- Open PlayIntegrityFix.
- Tap Fetch pif.json to automatically pull the config file tailored to your setup.
This file helps the module understand how best to spoof integrity signals.
🧩 Step 6: Configure TrickyStore
Now it’s time to fine-tune TrickyStore.
- Open the TrickyStore app.
- Tap the floating Action button in the bottom-right.
- Open the menu and go through the following:
- Tap Select All.
- Tap Deselect Unnecessary (only keep what you actually use).
- Tap Set Valid Keybox — very important for passing Strong Integrity.
📅 Step 7: Set the Security Patch Date
Google checks your device’s reported security patch date. If it’s missing or mismatched, integrity may fail.
- Open the menu again in TrickyStore.
- Select Set Security Patch.
- Tap Get Security Patch Date, then tap Save.
This sets a believable and current patch date in the system spoofing profile.
🚫 Step 8: Disable ROM Spoofing (If You’re Using Custom ROMs)
If your custom ROM has any kind of GMS spoofing or ROM identity faking features, disable them. These often interfere with integrity signals and confuse Google’s backend.
This step is often overlooked and can make or break your setup.
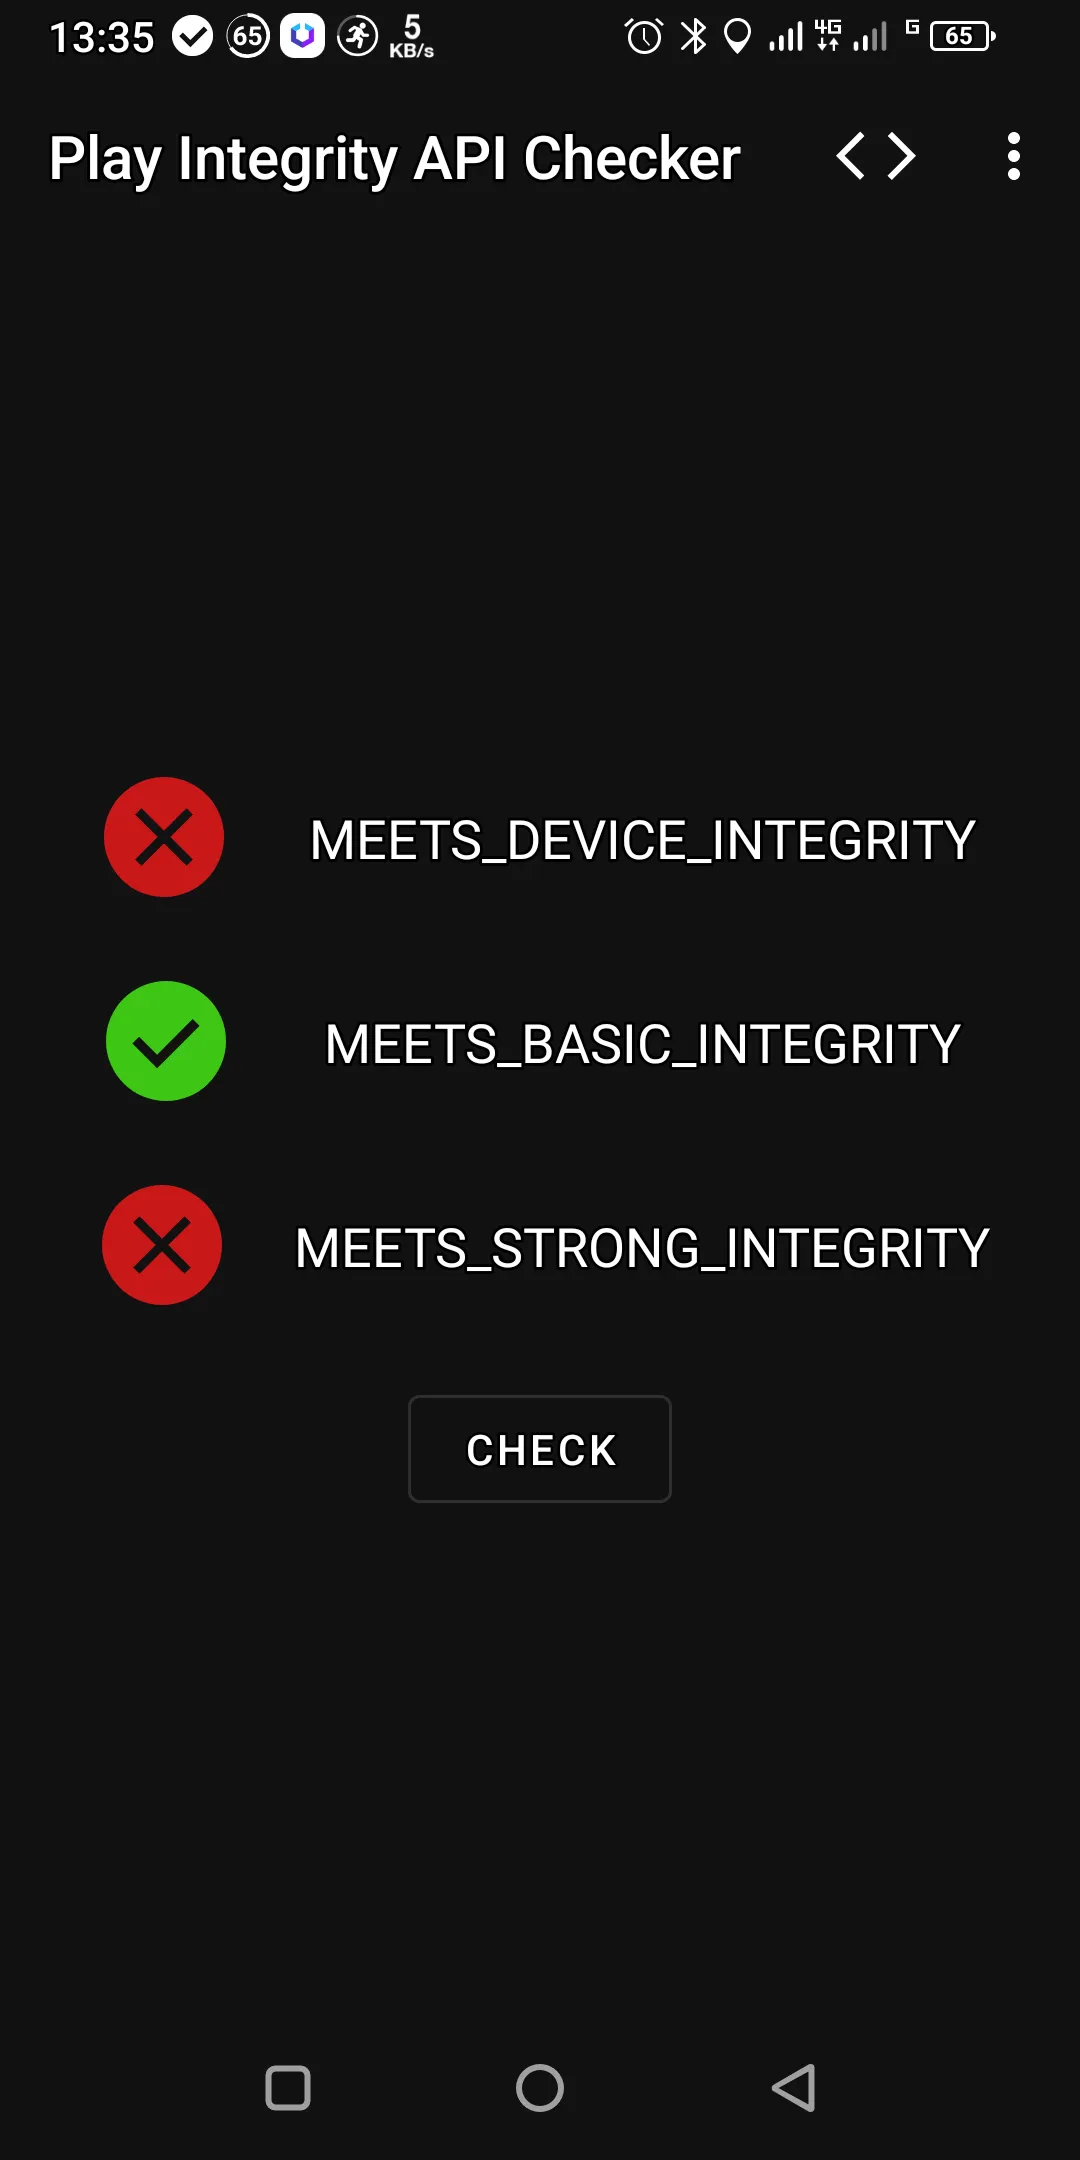
✅ Step 9: Verify Strong Integrity
After doing everything, it’s time to test.
Use the app Play Integrity API Checker from the Play Store. This tool will show you exactly where your device stands: Basic, Device, and Strong Integrity.
If you’ve followed each step correctly, you should see all three checks passing.
⚠️ Final Advice: Don’t Spam the Checks
One last thing — don’t keep checking Play Integrity repeatedly. Google monitors how often these checks are made. Excessive testing can trigger red flags and cause you to start failing, even on a good setup.
Only check when you’ve made real changes, and avoid daily or frequent integrity tests.


Post Comment