ad blocker
do it yourself
embedded
esp32
home networking
ad blocker, adblock hosts file, arduino dns server, arduino esp32 projects, block ads esp32, diy network security, dns filtering, dns server esp32, dns sinkhole, esp32, esp32 ad block, esp32 adblocker, esp32 projects, ESP32-S3, iot dns filter, local dns blocker, low power adblocker, network privacy, open source adblocker, pi-hole alternative
9M2PJU
0 Comments
Introducing ESP32_AdBlocker: A Smart, Affordable DIY DNS Sinkhole for Ad Blocking
Are you tired of intrusive ads and trackers slowing down your internet experience? If you’ve been considering solutions like Pi-hole, there’s now an affordable and lightweight alternative built for the ESP32 platform — introducing ESP32_AdBlocker.
This open-source project, available on GitHub (by s60sc), turns your ESP32-S3 (or ESP32 with PSRAM) into a local DNS sinkhole, blocking unwanted domains by simply responding with 0.0.0.0. It’s ideal for home networks, especially if you’re into DIY tech or want a compact and low-power network device.
What is ESP32_AdBlocker?
ESP32_AdBlocker functions much like Pi-hole, but is designed for the ESP32 platform using the Arduino environment. It runs a DNS server that filters requests based on a blocklist you define. Domains listed are quietly blackholed, meaning your devices never reach the ad servers — saving bandwidth and improving page load times.
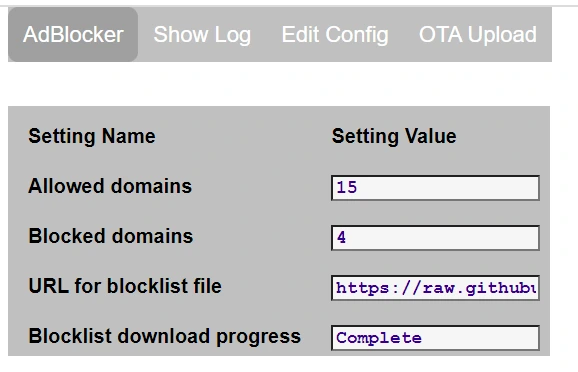
You also get a built-in web interface for easy setup, monitoring, and configuration.
Key Features
- DNS Sinkhole: Returns
0.0.0.0for domains in the blocklist, effectively blocking ads and trackers. - Web-based Interface: Control and configure the system from your browser. Includes log monitoring and real-time feedback.
- Daily Blocklist Updates: Automatically fetches and processes the blocklist from your selected source (supports HOSTS and AdBlock formats).
- Customizable: Full access to configuration files through Web UI or WebDAV. OTA updates supported.
- Performance Optimized:
- ESP32-S3 with 8MB PSRAM: Fully supports large blocklists (domain searches <50µs).
- ESP32 with 4MB PSRAM: Still functional with smaller blocklists (<100µs lookups).
Getting Started
Setup is beginner-friendly:
- Download the Source Code from GitHub and open it in the Arduino IDE.
- Ensure PSRAM is Enabled in your board settings.
- Use the Correct Partition Scheme:
- ESP32-S3: “8M with spiffs”
- ESP32: “Minimal SPIFFS”
- On first boot, the device starts in Wi-Fi AP mode (
ESP32_AdBlocker_XXXX) — connect to it and set up your Wi-Fi credentials via the captive portal (192.168.4.1).
Once connected, the application downloads web interface files automatically, and you’re ready to configure your blocklist source and other preferences.
Make It Your DNS
Once configured, simply replace your device or router’s DNS setting with the IP address of your ESP32_AdBlocker. For example:
netsh interface ip set dns "Wi-Fi" static 192.168.1.168
To revert to Google DNS:
netsh interface ip set dns "Wi-Fi" static 8.8.8.8
Note: Since ESP32_AdBlocker doesn’t support IPv6, you’ll need to disable IPv6 DNS to ensure proper routing through it.
Why Use ESP32_AdBlocker?
- Cost-effective: Runs on affordable ESP32 hardware.
- No cloud dependency: Everything runs locally.
- Energy-efficient: A perfect fit for always-on edge network devices.
- Fully Open Source: Licensed under AGPL-3.0 — ideal for tinkerers, hackers, and makers.
Final Thoughts
If you’re already in the ESP32 ecosystem or looking for a lightweight network filtering solution, ESP32_AdBlocker is an excellent project to explore. Whether for parental controls, privacy, or network efficiency, this tool gives you fine control without needing a full Linux server.
You can find the full source code and installation guide here:
🔗 GitHub Repository – ESP32_AdBlocker


Post Comment