Transforming Your Old Raspberry Pi into a Smart Home Hub with DietPi
Do you have an old Raspberry Pi gathering dust? Instead of letting it go to waste, you can turn it into a dedicated smart home controller. By using DietPi, an ultra-lightweight Linux distribution, we can run Home Assistant even on older hardware with surprising efficiency.
In this guide, we’ll walk through the process of installing Home Assistant using the optimized DietPi software catalog.
Prerequisites
- A Raspberry Pi (all models supported, though RPi 3/4/5 are faster).
- A high-quality SD card (Class 10 or A1/A2 rated).
- An active internet connection.
Step 1: Access Your DietPi Terminal
First, log in to your DietPi via SSH or a local terminal. Make sure your system is fully updated before starting:
Bash
sudo apt update
sudo apt upgrade
Step 2: Open the DietPi Software Optimizer
DietPi comes with a built-in tool that automates the installation of complex software. To open it, run:
Bash
dietpi-software
Step 3: Select Home Assistant
- Navigate to Browse Software.
- Scroll down to the Home Automation category.
- Find Home Assistant and press the Spacebar to select it (you will see an asterisk
[*]). - Tab over to OK and press Enter.
Step 4: Run the Installation
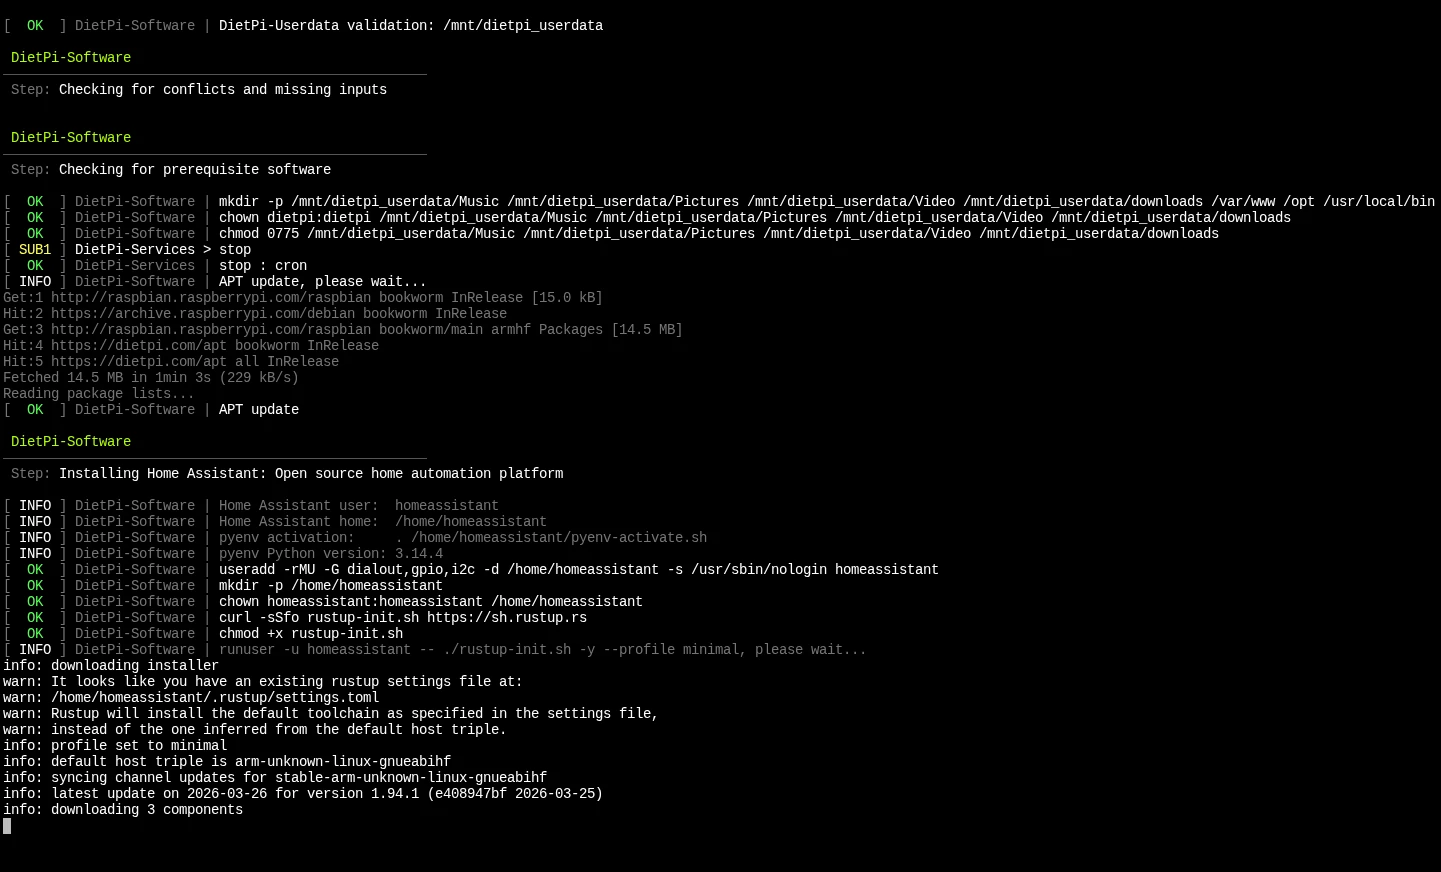
Once back in the main menu, navigate down to Install and press Enter.
Technical Note: On older single-core devices (like the Pi 1 or Zero), this process can take a significant amount of time (20–40 minutes). DietPi is compiling dependencies and setting up a Python virtual environment to ensure the best performance. Do not interrupt the process.
Step 5: Final Configuration
Once the installation finishes, the system will likely prompt for a reboot. After it comes back online, Home Assistant will start automatically in the background.
You can access your new dashboard by opening a web browser on your PC or phone and typing:
http://your-pi-ip-address:8123
Pro-Tips for Peak Performance
- Logging to RAM: Since Home Assistant writes to its database frequently, go to
dietpi-config> Advanced Options and ensure RAMlog is enabled. This extends the life of your SD card. - External Storage: If you find the system slowing down as your database grows, consider using
dietpi-drive_managerto move your user data to a USB SSD. - Stay Minimal: On older
armv6lhardware, keep your integrations simple. Avoid high-bandwidth tasks like live camera streaming to keep the interface snappy.
Conclusion
Installing Home Assistant on DietPi is the “pro-level” way to build a stable, lean smart home hub. You get the power of Home Assistant without the bloat of a standard operating system.


Post Comment