Conquer Your Linux Games: A Guide to Binding Gaming Mouse Keys with Input-Remapper
Gaming on Linux has come a long way, and with tools like Input-Remapper, you can finally unleash the full potential of your gaming mouse. This powerful application, considered by many to be the best solution for GNOME on Wayland, allows you to customize your mouse buttons and even create complex macros, giving you a competitive edge in your favorite games. This guide will walk you through installing and using Input-Remapper to bind your gaming mouse keys on your Linux desktop.
Why Remap Your Mouse Keys?
Before we dive into the how-to, let’s discuss why you might want to remap your mouse keys in the first place:
- Enhanced Control: Many games don’t utilize all the buttons on modern gaming mice. Re-mapping allows you to assign in-game actions to these unused buttons for quicker access to crucial commands.
- Macros and Combos: Execute complex sequences of keystrokes with a single button press. This is incredibly useful for MMOs or games with intricate combo systems.
- Accessibility: Remapping can make gaming more accessible for users with disabilities, allowing them to customize controls to suit their needs.
- Productivity Boost: Beyond gaming, remapping can streamline your workflow in other applications by assigning common tasks to your mouse buttons.
- Consistency Across Games: Create a unified control scheme for all your games, reducing the learning curve when switching between titles.
Installing Input-Remapper
Input-Remapper is available on various Linux distributions. The recommended method is usually through your distribution’s package manager. Here’s a general overview:
- Debian/Ubuntu-based distributions:
Bash
sudo apt update
sudo apt install input-remapper
- Fedora/RPM-based distributions:
Bash
sudo dnf install input-remapper
- Arch-based distributions:
Bash
sudo pacman -S input-remapper
If your distribution doesn’t have Input-Remapper in its repositories, you can usually build it from source. Refer to the official Input-Remapper GitHub page (https://github.com/sezanzeb/input-remapper) for detailed instructions.
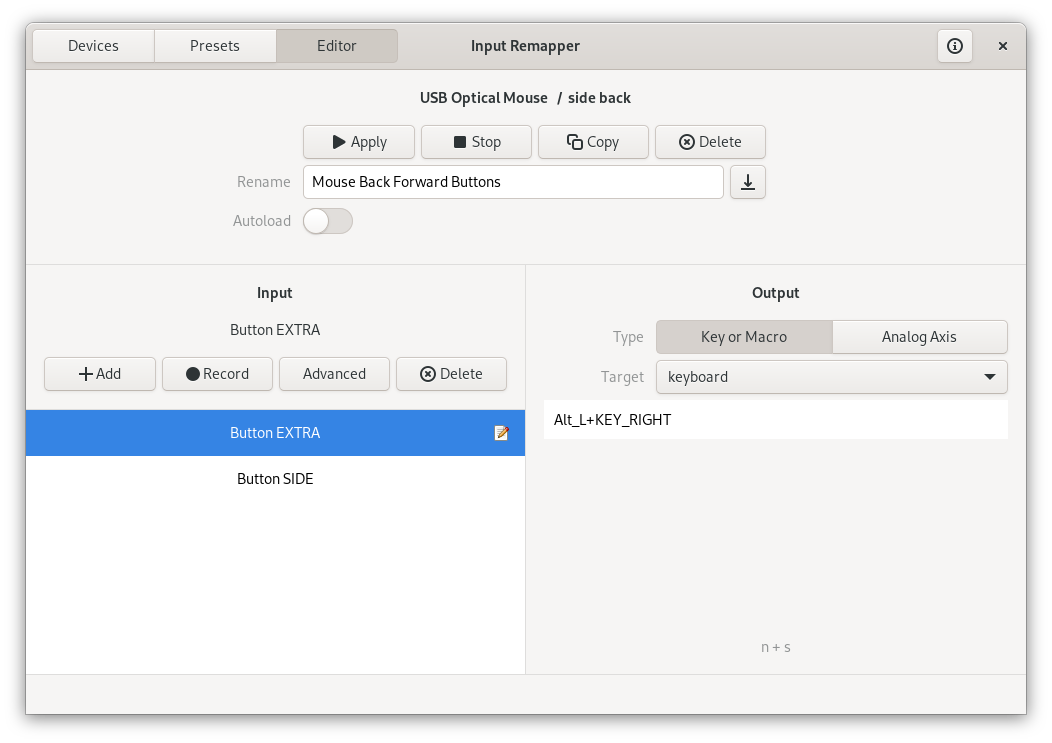
Configuring Input-Remapper
Once installed, launch Input-Remapper. You’ll be greeted with a user-friendly interface. Here’s a breakdown of the key elements:
- Device Selection: Choose your gaming mouse from the list of connected devices. Make sure it’s properly detected.
- Button Mapping: This is where the magic happens. You’ll see a visual representation of your mouse with clickable buttons.
- Action Assignment: When you click a button, you can assign various actions to it:
- Keypresses: Simulate pressing any key on your keyboard, including combinations (e.g., Ctrl+Shift+T).
- Mouse Clicks: Simulate mouse clicks (left, right, middle, etc.).
- Macros: Record and playback sequences of keystrokes and mouse clicks.
- Special Actions: Input-Remapper also offers some special actions, like adjusting volume or launching applications.
Step-by-Step Guide to Remapping a Mouse Button
Let’s walk through a simple example of remapping a side button on your mouse to simulate the “G” keypress:
- Select Your Mouse: Open Input-Remapper and select your gaming mouse from the device list.
- Identify the Button: Click on the visual representation of your mouse to identify the button you want to remap. Input-Remapper should highlight the corresponding button on your physical mouse.
- Assign the Action: Click on the selected button in Input-Remapper. A dialog box will appear allowing you to choose the action.
- Choose “Keypress”: Select the “Keypress” option.
- Enter the Key: Type “G” into the key input field.
- Save the Configuration: Click “Save” to apply your changes.
Now, when you press the remapped button on your mouse, it will be as if you pressed the “G” key on your keyboard.
Creating Macros
Macros are where Input-Remapper truly shines. Here’s how to create one:
- Select the Button: Choose the button you want to assign the macro to.
- Choose “Macro”: Select the “Macro” option.
- Record the Sequence: Click “Start Recording” and perform the sequence of keystrokes and mouse clicks you want to include in the macro.
- Stop Recording: Click “Stop Recording” when you’re finished.
- Save the Macro: Give your macro a name and save it.
Now, pressing the assigned button will execute the entire recorded sequence.
Tips and Tricks
- Profiles: Create different profiles for different games or applications. This allows you to quickly switch between control schemes.
- Modifiers: Use modifier keys (Ctrl, Shift, Alt) in your key mappings and macros for even more complex actions.
- Testing: Always test your remappings in-game to ensure they work as intended.
- Troubleshooting: If a button isn’t working, double-check that you’ve selected the correct device and button in Input-Remapper. Also, make sure the application has the necessary permissions to access your input devices. Restarting Input-Remapper or even your computer can sometimes resolve issues.
- Community Resources: The Input-Remapper GitHub page and community forums are excellent resources for finding help and sharing your configurations.
Beyond Gaming
While this guide focuses on gaming, remember that Input-Remapper can be used for a wide range of tasks. Think about how you can streamline your workflow in other applications by assigning common actions to your mouse buttons.
Conclusion
Input-Remapper is a powerful tool that can significantly enhance your gaming experience on Linux, especially on GNOME with Wayland. By following this guide, you can unlock the full potential of your gaming mouse and take your skills to the next level. So, go ahead, experiment, and customize your controls to dominate your favorite games!


Post Comment