Installing Allmon2 for AllStarLink Node
Allmon2 is a web-based interface designed for managing AllStarLink nodes, providing an intuitive way to monitor and control repeater systems remotely. It allows Amateur radio operators to check node status, make connections, and perform administrative tasks efficiently. This guide covers the installation and configuration of Allmon2 on your AllStarLink node.
Prerequisites
Before proceeding with the installation, ensure that your system has the required components:
- Apache or Lighttpd (for hosting the web interface)
- PHP
- Git
If these are not already installed, refer to the official documentation for the latest installation instructions.
Step-by-Step Installation Guide
1. Log in to Your Node
Access your AllStarLink node as the ‘repeater’ user. You can do this via SSH or by directly connecting a keyboard and monitor.
ssh repeater@your-node-ip
2. Install Git and Clone Allmon2 Repository
Run the following commands to install Git and download Allmon2 to the web directory:
sudo apt install git -y
sudo git clone https://github.com/AllStarLink/AllMon2.git /var/www/html/allmon2
3. Configure Allmon2 Files
Change to the Allmon2 directory and rename configuration files:
cd /var/www/html/allmon2
sudo mv allmon.ini.txt allmon.ini.php
sudo mv controlpanel.ini.txt controlpanel.ini.php
4. Edit the Configuration File
Modify the Allmon2 configuration to match your node settings:
sudo nano allmon.ini.php
Update the following fields:
- Replace
[500]with your actual node number. - Set
host=127.0.0.1:5038. - Update
passwd=yourpassword(Check/etc/asterisk/manager.conffor the correct password). - Change
menu=yesif you want a menu interface.
Save the changes by pressing <CTRL> + X, then Y, and <Enter>.
Example configuration:
[1234]
system=MySites
host=127.0.0.1
user=admin
passwd=yourpassword
nomenu=yes

[1234 My Node]
system=MySites
nodes=1234
Enabling Buttons and Control Panel
To set up authentication for the web interface, create a password for the admin user:
cd /var/www/html/allmon2
htpasswd -cB .htpasswd admin
chmod 777 astdb.php
Note: Avoid using an exclamation mark in the password, as it may cause issues.
Database Setup
You need to create and update the database file manually:
cd /var/www/html/allmon2
sudo ./astdb.php
To keep the database updated, schedule a cron job to run the above command daily.
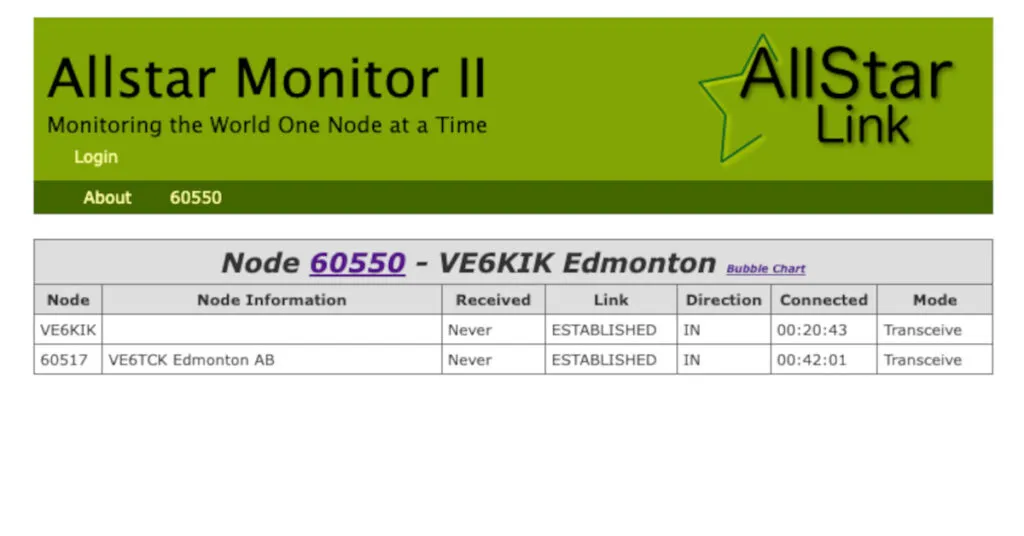
Testing and Using Allmon2
Once the installation is complete, access Allmon2 via your web browser:
http://192.168.x.x/allmon2
Log in with:
- Username:
admin - Password: The one you set using
htpasswd(default isllcgi).
Lighttpd Configuration (Optional)
If you’re using Lighttpd instead of Apache, you need to modify its configuration. Edit /etc/lighttpd/lighttpd.conf and add:
server.stream-response-body = 2
Restart Lighttpd for changes to take effect:
sudo systemctl restart lighttpd
Final Thoughts
With Allmon2 installed and configured, you now have a powerful tool to manage your AllStarLink node efficiently. It provides real-time monitoring and control capabilities, making node administration seamless for amateur radio operators. Stay updated with the latest releases and improvements by checking the AllStarLink GitHub repository.
Happy operating and 73!


Post Comment