Hosting a Web Server Securely with Cloudflare Zero Trust Tunnel on MikroTik (Using Docker)
You have a web server running in your home network – maybe it’s a dashboard, self-hosted site, or internal tool. You want to access it remotely, but without port forwarding or exposing your public IP.
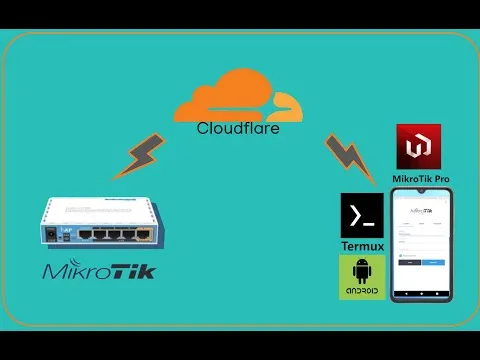
This guide shows you how to safely publish your internal website using Cloudflare Tunnel, hosted directly on your MikroTik router via Docker.
📘 Scenario
| Component | Value |
|---|---|
| Web Server IP | 192.168.0.10 |
| MikroTik Gateway | 192.168.0.1 |
| Public Hostname | webserver.domain.com |
| Tunnel Host | MikroTik (via Docker) |
Your router will run the Cloudflare Tunnel and forward requests securely to your internal PC running the web server.
✅ Prerequisites
- MikroTik router with Docker support (e.g. RB5009, CCR2004, CHR)
- RouterOS 7.5+
- USB flash drive plugged into MikroTik (for container storage)
- Web server running at
192.168.0.10:80 - A Cloudflare account with your domain added (e.g.
domain.com)
🔧 Step 1: Enable Docker on MikroTik
- Install the container package:
Get it from mikrotik.com/download under RouterOS v7 > Extra packages. - Reboot after installation.
- Set Docker storage:
/container config set root-dir=disk1/docker - Enable Docker:
/container set enabled=yes
☁️ Step 2: Create Tunnel (on any PC)
Only needed once – you can delete the PC tunnel afterward.
- Install Cloudflared:
sudo apt install cloudflared - Authenticate:
cloudflared tunnel loginThis opens a browser window. Log in and choose your domain. - Create a tunnel:
cloudflared tunnel create webserver-tunnelThis generates a.jsoncredential file. - Create config file
config.yml:tunnel: webserver-tunnel credentials-file: /cloudflared/webserver-tunnel.json ingress: - hostname: webserver.domain.com service: http://192.168.0.10:80 - service: http_status:404
📂 Step 3: Transfer Files to MikroTik
Copy the following files to your MikroTik into /disk1/cloudflared/:
webserver-tunnel.jsonconfig.yml
Use SCP or drag & drop via Winbox → Files.
🐳 Step 4: Run Cloudflared Docker Container on MikroTik
- Add the container:
/container add \ remote-image=cloudflare/cloudflared:latest \ name=cloudflared \ root-dir=disk1/cloudflared \ command="tunnel --config /etc/config.yml run" - Start it:
/container start cloudflared
🌐 Step 5: Configure Cloudflare Dashboard (Zero Trust)
Now go to https://one.cloudflare.com and:
- Navigate to Access → Tunnels.
- Click your tunnel (
webserver-tunnel). - Click “Add a public hostname”.
- Fill in:
- Subdomain:
webserver - Domain:
domain.com - Service:
http://192.168.0.10:80
- Subdomain:
- Click Save.
Now Cloudflare knows where to route incoming requests.
✅ Done! Test It
Visit:
https://webserver.domain.com
Your site should load – even if you’re on mobile or outside your home network. All traffic is encrypted and proxied via Cloudflare, without any port forwarding.
🛡️ Optional: Add Zero Trust Access Policy
Want to protect the site with a login?
- In Cloudflare dashboard, go to:
Access → Applications → Add Application - Choose Self-hosted.
- Fill in:
- App name:
Web Server - URL:
https://webserver.domain.com
- App name:
- Set who can access (e.g. emails, GitHub, etc.)
Now only authorized users can access your internal site.
🧠 Summary
| Feature | Status |
|---|---|
| No port forwarding | ✅ |
| Works behind NAT | ✅ |
| Runs on MikroTik | ✅ |
| Secure Cloudflare Tunnel | ✅ |
| Access via domain | ✅ |
You’ve now turned your MikroTik router into a secure gateway for publishing internal services to the internet – the Cloudflare way.


Post Comment