Introduction:
Quad loop single-element antennas have gained popularity among amateur radio operators due to their compact size, simplicity, and excellent performance on high-frequency bands. In this blog post, we will provide a comprehensive guide on how to build a quad loop single-element antenna with a BALUN (Balanced-Unbalanced) transformer for high-frequency operation. Whether you are a seasoned antenna builder or a beginner looking to embark on your first antenna project, this guide will walk you through the process step by step.
1. Understanding the Quad Loop Single-Element Antenna:
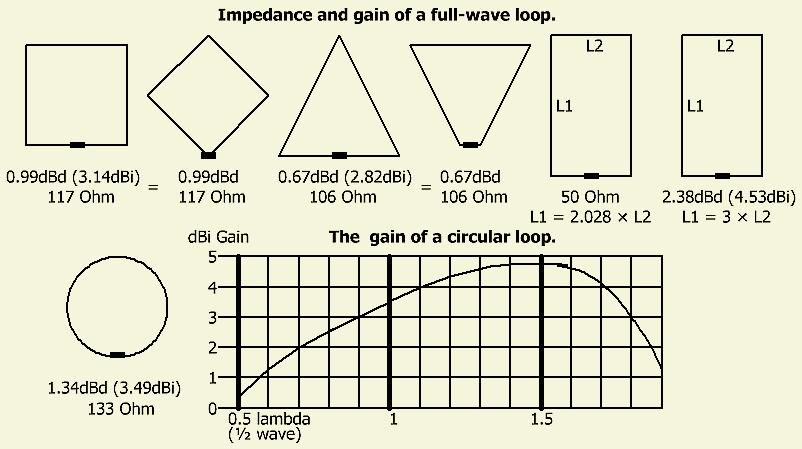
The quad loop single-element antenna consists of a square or rectangular loop made from wire or tubing. It is a resonant antenna that operates on a specific frequency or a narrow frequency range, depending on its dimensions. This antenna design provides a low angle of radiation, high gain, and excellent directivity, making it ideal for long-distance communication on high-frequency bands.
2. Gathering the Materials:
To build a quad loop single-element antenna, you will need the following materials:
– Copper wire or tubing: Select a suitable gauge of copper wire or tubing based on the frequency range you intend to operate. Thicker wire or tubing is recommended for lower frequencies.
– Insulators: Use insulators to support and isolate the antenna elements from the supporting structure.
– Coaxial cable: Choose a coaxial cable with the appropriate impedance and length to connect the antenna to your radio equipment.
– Mounting hardware: Depending on your installation preference, gather the necessary hardware such as clamps, brackets, and mast support.
– BALUN: A BALUN transformer is used to match the balanced quad loop antenna to the unbalanced coaxial cable, ensuring efficient power transfer and minimizing common-mode currents.
3. Determining the Dimensions:
The dimensions of the quad loop single-element antenna are critical for achieving resonance at the desired frequency. Use an online antenna calculator or software to calculate the dimensions based on the target frequency. Input parameters such as the desired frequency, conductor diameter, and loop shape to determine the optimal dimensions of your antenna.
Loop Length (in feet) = 1005 / Frequency (in MHz)
This formula provides a rough estimate of the loop length based on the wavelength of the desired frequency. Keep in mind that this formula assumes a square loop shape and does not account for any additional factors, such as wire diameter or tubing thickness. Therefore, it’s important to use this formula as a starting point and fine-tune the dimensions through testing and tuning.
4. Constructing the Quad Loop:
Follow these steps to construct the quad loop single-element antenna:
a. Cut the copper wire or tubing according to the calculated dimensions. Ensure the ends are clean and free from any coating or insulation.
b. Bend the wire or tubing to form a square or rectangular loop. Use precision measurements and a bending tool if necessary.
c. Secure the corners of the loop with insulators. These insulators will serve as attachment points for support ropes or reflector elements.
d. Install additional insulators at appropriate points along the loop to provide mechanical support and prevent the loop from sagging.
5. Adding the BALUN:
a. Determine the appropriate type of BALUN based on the impedance of your quad loop antenna and the impedance required by your radio equipment. Common types include 1:1, 4:1, or 9:1 BALUNs.
b. Connect one side of the BALUN to the feed point of the quad loop antenna, ensuring a secure connection.
c. Connect the other side of the BALUN to the coaxial cable, matching the impedance requirements of both the BALUN and the cable.
6. Mounting and Installation:
a. Choose a suitable location for mounting the antenna. Consider factors such as height, clear line of sight, and proximity to obstructions.
b. Attach the quad loop to a mast or support structure using the mounting hardware. Ensure the antenna is securely fastened and properly grounded.
c. Connect the coaxial cable to your radio equipment, ensuring proper grounding and avoiding any sharp bends or kinks that could degrade signal quality.
7. Testing and Tuning:
Once the antenna is installed, it is essential to test and tune it for optimal performance:
a. Use an antenna analyzer or a radio transceiver with a built-in SWR meter to measure the standing wave ratio (SWR) of the antenna.
b. Make small adjustments to the dimensions of the quad loop if necessary, based on SWR readings, to achieve resonance at the desired frequency.
c. Repeat the testing and tuning process until you achieve the best possible SWR and resonance.
Conclusion:
Building a quad loop single-element antenna with a BALUN for high-frequency operation can be a rewarding and cost-effective project for amateur radio operators. By understanding the principles behind this antenna design and following the step-by-step guide provided, you can construct an antenna that offers excellent performance, long-distance communication capabilities, and a compact design. Remember to adhere to safety guidelines, obtain any necessary permits or permissions for antenna installation, and enjoy the journey of building and experimenting with your homemade antenna. With a properly constructed quad loop single-element antenna and the addition of a BALUN, you’ll be rewarded with enhanced communication capabilities on the high-frequency bands, improved power transfer, and reduced common-mode currents.

