amateur radio
433 MHz, 9M2PJU, amateur radio, APRS, APRSMYSunday, esp32, ESP32-S3, firmware, GPS tracking, ham radio, hamradio.my, Heltec Wireless Tracker, lora, LoRa APRS, malaysia, open source, Parks on the Air, portable operation, POTA, smart beaconing, sota, summits on the air, winlink
9M2PJU
2 Comments
The 9M2PJU Mod LoRa APRS Tracker: A Tiny Malaysian Companion for the SOTA, POTA and the APRSMY Sunday Net
The 9M2PJU Mod LoRa APRS Tracker: A Tiny Malaysian Companion for the Trail, the Road, and the Sunday Net
There is something quietly satisfying about a small box that knows where it is, tells the world where it is, and does it all without a SIM card, a subscription, or a phone in your pocket. You clip it to your backpack, you switch it on, and a few seconds later your callsign appears on the APRS map, bouncing along whatever path you happen to be walking.
That is the idea behind the 9M2PJU Mod LoRa APRS Tracker, a Malaysia-tuned fork of the lovely LoRa APRS Tracker by Ricardo Guzman (CA2RXU). It runs on the Heltec Wireless Tracker board, a pocket-sized ESP32-S3 with a LoRa radio, a GPS module, and a tiny 80×160 colour TFT screen. It speaks APRS over LoRa on 433.400 MHz, which is the friendly part of the band we use here in Malaysia.
Last updated: July 2026.
What It Is, in One Breath
It is a self-contained APRS tracker. No phone required, no cellular network, no monthly bill. You power it on, the GPS finds the sky, and it starts broadcasting your position, callsign, and APRS symbol over LoRa to any nearby iGate. From there, your dot shows up on aprs.fi, HamHut, and the rest of the global APRS network, just like a regular RF beacon.
The firmware is built and maintained by 9M2PJU, forked from CA2RXU’s open source project and tuned for Malaysian operators. The full source lives on GitHub at 9M2PJU/LoRa_APRS_Tracker, and there is a browser-based flasher at lora.hamradio.my so you do not even need to install PlatformIO to get going.
The Hardware: A Pocket-Sized Shack
The target board is the Heltec Wireless Tracker, and it is a genuinely charming little piece of kit:
- ESP32-S3 dual-core processor with WiFi and Bluetooth
- SX1262 LoRa radio for the 433 MHz band
- U-blox GPS for position
- 0.96 inch ST7735 colour TFT, 80 by 160 pixels
- Two buttons (BOOT and RST) for menu navigation
- USB-C for power and flashing
- 8 MB flash with a partition layout that leaves room for a SPIFFS filesystem holding the web configuration page
It fits in the palm of your hand. With a small 18650 cell and a 3D-printed case, it becomes a proper portable tracker you can take up a hill, on a motorbike ride, or to a SOTA activation.
What 9M2PJU Changed for Malaysia
The original CA2RXU firmware is excellent, but it is tuned for European and world-wide defaults. The fork keeps all of that goodness and adds a layer of Malaysian comfort on top.
LoRa on 433.400 MHz
Preset 1 is set to 433.400 MHz, which is where Malaysian LoRa APRS activity lives. The on-screen label reads LoRa[MY] instead of LoRa[Eu], and when you switch frequencies the change message says MALAYSIA instead of EU/WORLD. Small touches, but they make the device feel like it belongs here.
The LoRa modem settings for the Malaysian preset are sensible for low-power portable work: spreading factor 12, 125 kHz bandwidth, coding rate 4/5, and 20 dBm output. That is a slow but robust configuration, the kind that gets your packets through trees and urban clutter at the cost of a slightly longer air time per beacon.
Malaysia Time on the Display
The clock on the screen shows Malaysia Time (UTC+8), so you do not have to do the mental arithmetic every time you glance at it. The APRS packets themselves still use UTC, because that is what the standard requires, but what you read on the TFT is local time. A small kindness.
APRSMYSunday Net Check-In
This is the feature I am most fond of. The original firmware has APRSThursday, the European net check-in. Malaysia has its own Sunday Net run under the callsign APRSMY, and this fork adds a dedicated menu entry for it.
To check in:
- Go to Messages, APRSMYSunday, Check In
- Pick Quick Check In to send the canned message
CHECK #APRSMYSunday Net from LoRa Tracker 73! - Or pick Custom message to type your own text, which gets sent to
APRSMYwith the prefixCHECK #APRSMY
No phone, no laptop, no digging through menus on a phone app. You check in to the net from the side of a hill, with cold fingers, in about ten seconds. That is the whole point of having a tracker.
A Display That Is Actually Pleasant to Read
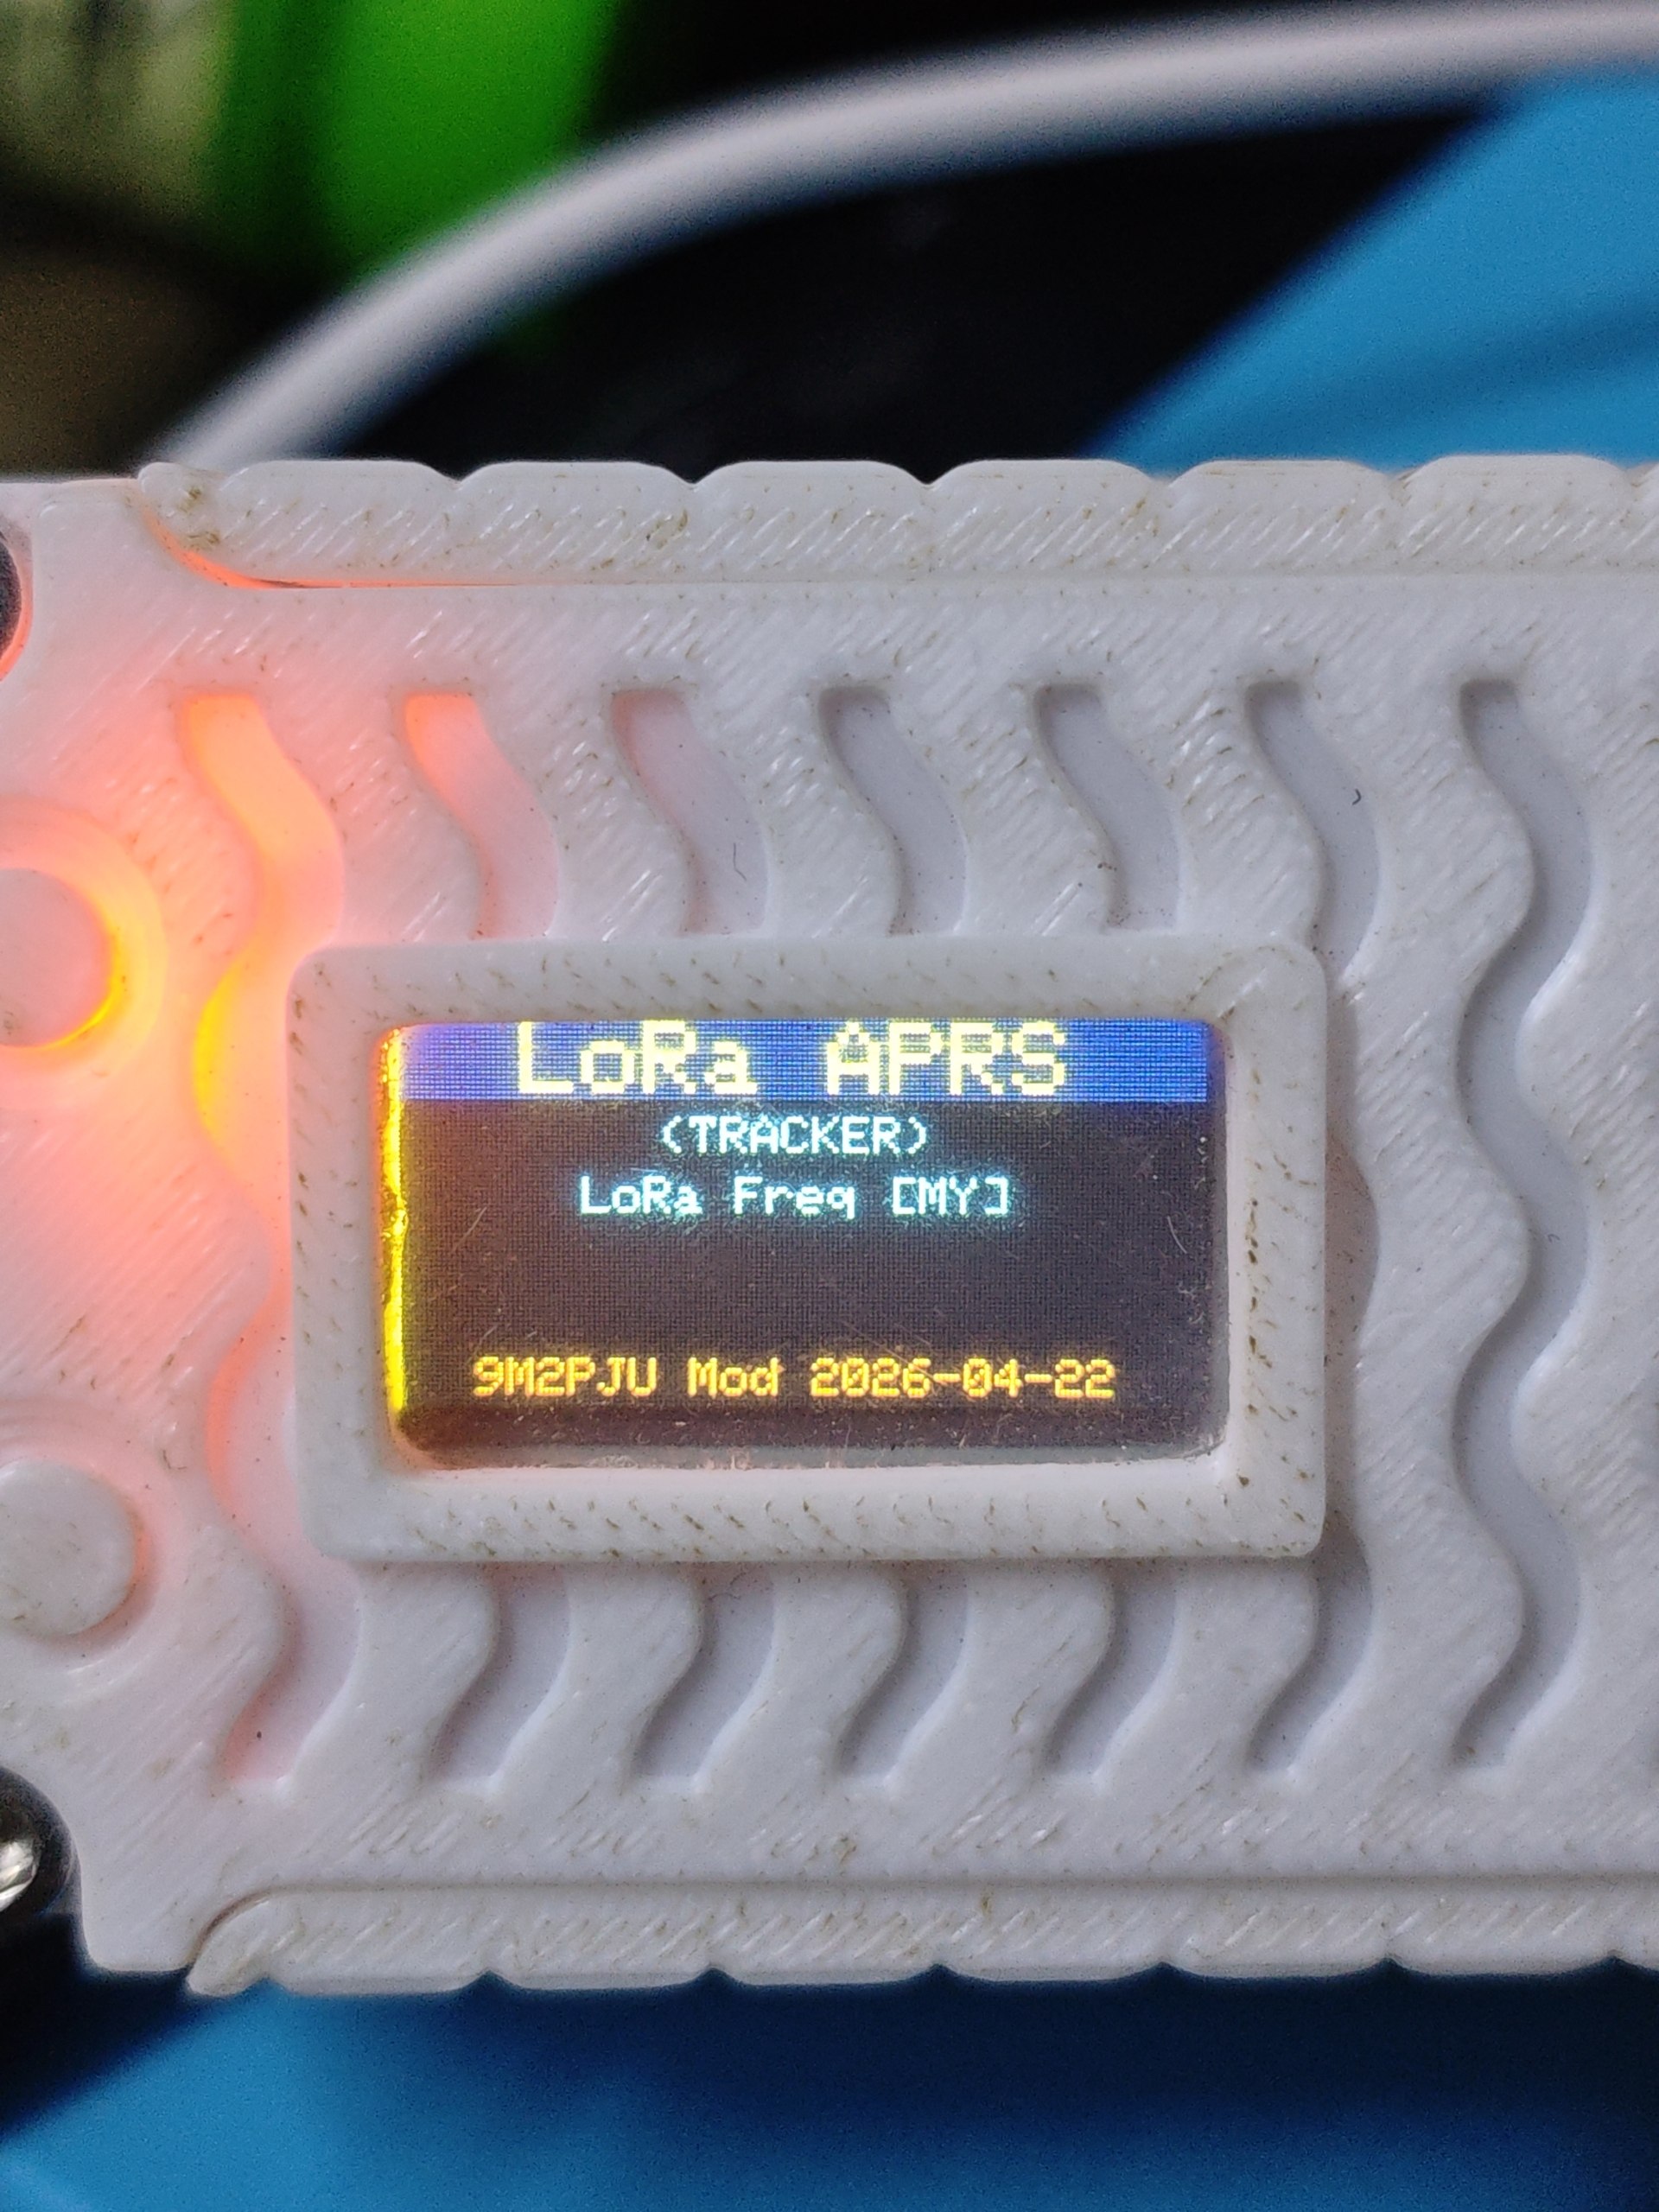
The original firmware uses a yellow-on-red header and left-aligned white body text. It works, but on a tiny 80×160 screen it can feel a bit cluttered. The fork redesigns the display from scratch:
- Navy blue header bar with bright yellow text, centred
- Centred body text so everything lines up neatly on the narrow screen
- Colour-coded lines: red for GPS warnings, orange for battery and button hints, green for altitude and speed, yellow for GPS coordinates and the Maidenhead grid, cyan for date and time, grey for the last heard station, white for everything else
- Coloured APRS symbols: cars and bikes in red, ships in blue, houses and antennas in green, balloons and aircraft in magenta, trains in orange, runners and weather stations in cyan
- A 2-pixel status accent bar down the left edge: green when GPS is locked, yellow while it is searching, blue when Bluetooth is connected, grey when idle
The startup screen reads 9M2PJU Mod followed by the version date, so you always know which firmware is on the board.
Sensible Default Config
Out of the box, the shipped config is ready for a Malaysian operator:
| Setting | Value |
|---|---|
| Callsign | 9M2PJU-7 (all three profiles) |
| LoRa frequency | 433.400 MHz |
| Profile 1 symbol | runner [ |
| Profile 2 symbol | car > |
| Profile 3 symbol | motorcycle < |
| GPS Eco Mode | off (GPS always active) |
| APRS path | WIDE1-1 |
| Display timeout | 3 seconds |
| Winlink email | [email protected] |
You will want to change the callsign to your own, of course. That is easy to do from the web configuration page after flashing.
Smart Beaconing, Three Ways
Smart beaconing is the bit of magic that decides how often to transmit based on how fast you are moving and whether you are turning. The fork ships three presets, each matched to a profile:
- Runner (slow): beacons every 120 seconds when standing, tightens up to every 3 seconds at low speed, with a turn threshold tuned for foot pace
- Bike (medium): a middle ground for cyclists, with a 40 km/h fast speed threshold
- Car (fast): beacons every 120 seconds when stopped, every 10 seconds above 70 km/h, with a wider turn angle so you do not spam the channel on every highway lane change
You switch profiles from the menu with a couple of button presses. On a motorbike ride I will use the bike preset; on a drive up to Genting I will switch to car; on a hike I will use runner. The tracker figures out the rest.
SOTA and POTA Spots and Alerts, Right From the Tracker
This is the feature that surprised me the most. Tucked inside the Reports menu, alongside the weather report and the nearest hospital, police, and fire station lookups, there are two entries for SOTA (Summits on the Air) and POTA (Parks on the Air). Each one opens into two submenus: Spots and Alerts.
When you select SOTA Spots, the tracker sends a LoRa APRS message to the 9M2PJU-4 gateway asking for current SOTA spot activity. The gateway fetches the latest spots from the SOTAwatch API, packages them into APRS message packets, and sends them back to your tracker over LoRa. You get a tidy list of who is activating which summit, right on the little TFT screen, with no phone and no cellular signal needed.
The same works for SOTA Alerts (upcoming activations other hams have posted), POTA Spots (who is in a park right now), and POTA Alerts (planned park activations). Four queries, one gateway, all over LoRa.
The menu path is simple:
- Go to Reports, SOTA (or POTA)
- Pick Spots to see who is active right now
- Pick Alerts to see what activations are coming up
The request goes out as a short APRS message to callsign 9M2PJU-4, which is the Malaysia LoRa gateway that handles these lookups. If you are within LoRa range of that gateway, the reply comes back in a few seconds as a series of APRS messages. If you are out of range, the request still goes out but nobody answers, which is the same gentle limitation as the APRSMYSunday check-in.
For a SOTA activator on a summit with no cellular coverage, this is a lovely thing. You climb the hill, you set up your station, you beacon your position, and then you check SOTA Spots to see if anyone else is on a summit nearby that you might work. All from the tracker in your hand, all over LoRa, all off-grid.
Flashing It: The Easy Way
The friendliest way to get the firmware onto a Heltec Wireless Tracker is the web installer at lora.hamradio.my. It uses ESP Web Tools, which talks to the board over Web Serial directly from the browser. No software to install, no toolchain to set up.
- Open lora.hamradio.my in Google Chrome or Microsoft Edge (Firefox and Safari do not support Web Serial)
- Plug in your Heltec Wireless Tracker with a USB-C cable, ideally a data cable and not a charge-only one
- Click INSTALL, pick the serial port (usually “USB JTAG/serial debug unit”), and click INSTALL again
- Wait for the progress bar to finish. The tracker reboots on its own with the new firmware
If the installer cannot connect, put the board into download mode first: press BOOT and RST together, the screen goes blank, then click INSTALL. After it finishes, press RST once to boot into the firmware.
The web installer flashes five parts in one go: bootloader, partition table, boot app, firmware, and the SPIFFS filesystem that holds the default config. So when you are done, you really are done.
Changing Settings Without a Computer
After flashing, the tracker starts up with the Malaysian defaults. To change your callsign, LoRa settings, or anything else, you do not need to plug it back into a computer. The firmware has a built-in WiFi access point for configuration:
- On the tracker, enable WiFi AP mode from the menu
- On your phone or laptop, join the WiFi network LoRaTracker-AP with password 1234567890
- Open 192.168.4.1 in a browser
- Change your callsign, symbols, LoRa frequency, smart beaconing, Bluetooth, battery, notifications, Winlink, and more
- Save and reboot
The web UI is the same one CA2RXU ships, just with the Malaysian defaults baked in. It is clean, fast, and works fine on a phone screen.
Building From Source
If you prefer to build your own firmware, or you want to tweak something the web UI does not expose, the project builds with PlatformIO:
pio run -e heltec_wireless_tracker              # build firmware
pio run -e heltec_wireless_tracker -t upload    # flash firmware over USB
pio run -e heltec_wireless_tracker -t uploadfs  # flash the config filesystem
The board target is esp32-s3-devkitc-1 with the huge_app.csv partition table and 8 MB of flash. The full list of dependencies is in platformio.ini and common_settings.ini, including RadioLib 7.6.0, ArduinoJson 7.4.2, TinyGPSPlus, NimBLE, and the APRSPacketLib from CA2RXU.
There are 38 supported board variants in the upstream project, but the 9M2PJU mod is built and tested specifically for the Heltec Wireless Tracker. The web installer and pre-built binaries are all for that board.
Keeping Up With Upstream
One of the nice things about a fork like this is that it does not have to drift. The upstream CA2RXU project is actively developed, and the 9M2PJU fork tracks it. The last sync pulled in 22 upstream commits, including a Winlink fix, a GPS waiting display improvement, a Bluetooth KISS fix, the ArduinoJson 6 to 7 migration, and a few new board variants.
When upstream moves, the Malaysian modifications are preserved: the APRSMYSunday check-in, the custom Heltec display colours, the centred text layout, the startup branding, the LoRa[MY] labels, the shipped config, and the web flasher. It is a careful merge, not a rebase, so the git history stays readable.
A Few Honest Notes
This is a hobby project, offered free and open source under the GPL. A few things worth knowing before you build a SOTA trip around it:
The LoRa range is line of sight and depends heavily on your antenna and terrain. With the stock whip antenna you will get a kilometre or two in urban areas and several kilometres with a clear path. With a proper elevated antenna you can do much better. It is not a satellite communicator and it will not replace a PLB for serious backcountry use.
The GPS is a U-blox module and it is competent, but a cold start can take 30 to 60 seconds the first time you power on, especially indoors. Give it a clear view of the sky for its first fix and it will be much faster afterwards.
The Winlink password in the shipped config is a placeholder. If you want to use the Winlink email feature to send position messages to a gateway, you will need to set your own real Winlink account password from the web UI.
The APRSMYSunday check-in only works if there is an iGate within LoRa range that is listening on 433.400 MHz and forwarding to the APRS-IS. In the Klang Valley that is usually fine. In the middle of nowhere, your check-in packet will go out but nobody will hear it. That is just how RF works.
Why a Tracker Like This Matters
APRS is one of those parts of amateur radio that rewards tinkering. You can run it from a phone app, and many people do, but a phone app depends on cellular coverage and a charged battery and a data plan. A dedicated LoRa tracker depends on nothing but a charged battery and a view of the sky.
It is also a quiet kind of fun. You are not making contacts in the traditional sense. You are just being visible on the map, leaving a little trail of packets behind you, and contributing to the network for everyone else who is watching. When someone else’s dot moves on aprs.fi, that is their tracker talking to an iGate, and your iGate might be the one that heard it.
The 9M2PJU mod is a small attempt to make that experience feel native to Malaysia. The right frequency, the right timezone, the right net check-in, and a display that is calm to read at a glance. Nothing more than that, and nothing less.
Try It on Your Next Outing
The next time you are heading out for a drive, a ride, or a walk with a view, clip one of these to your bag. Flash it from lora.hamradio.my, set your callsign from the web UI, and let it beacon. By the time you reach the top of the hill, your dot will already be on the map, and the Sunday Net will know you checked in.
73, and may your packets be heard.
Sources and Further Reading
- 9M2PJU Mod LoRa APRS Tracker (source code): https://github.com/9M2PJU/LoRa_APRS_Tracker
- Firmware Web Installer: https://lora.hamradio.my
- Original CA2RXU LoRa APRS Tracker (upstream): https://github.com/richonguzman/LoRa_APRS_Tracker
- HamRadio.my: https://hamradio.my/
- About 9M2PJU: https://hamradio.my/about-9m2pju-malaysian-amateur-radio-operator/
- Heltec Wireless Tracker (board info): https://heltec.org/project/wireless-tracker/
- ESP Web Tools (flasher technology): https://esphome.github.io/esp-web-tools/
- APRS.fi (live APRS map): https://aprs.fi/
- Guide To Obtain Amateur Radio License In Malaysia: https://hamradio.my/guide-to-obtain-amateur-radio-license-in-malaysia/


2 comments