WebCHIRP: Program Ham Radios in Your Browser with WebAssembly and Web Serial
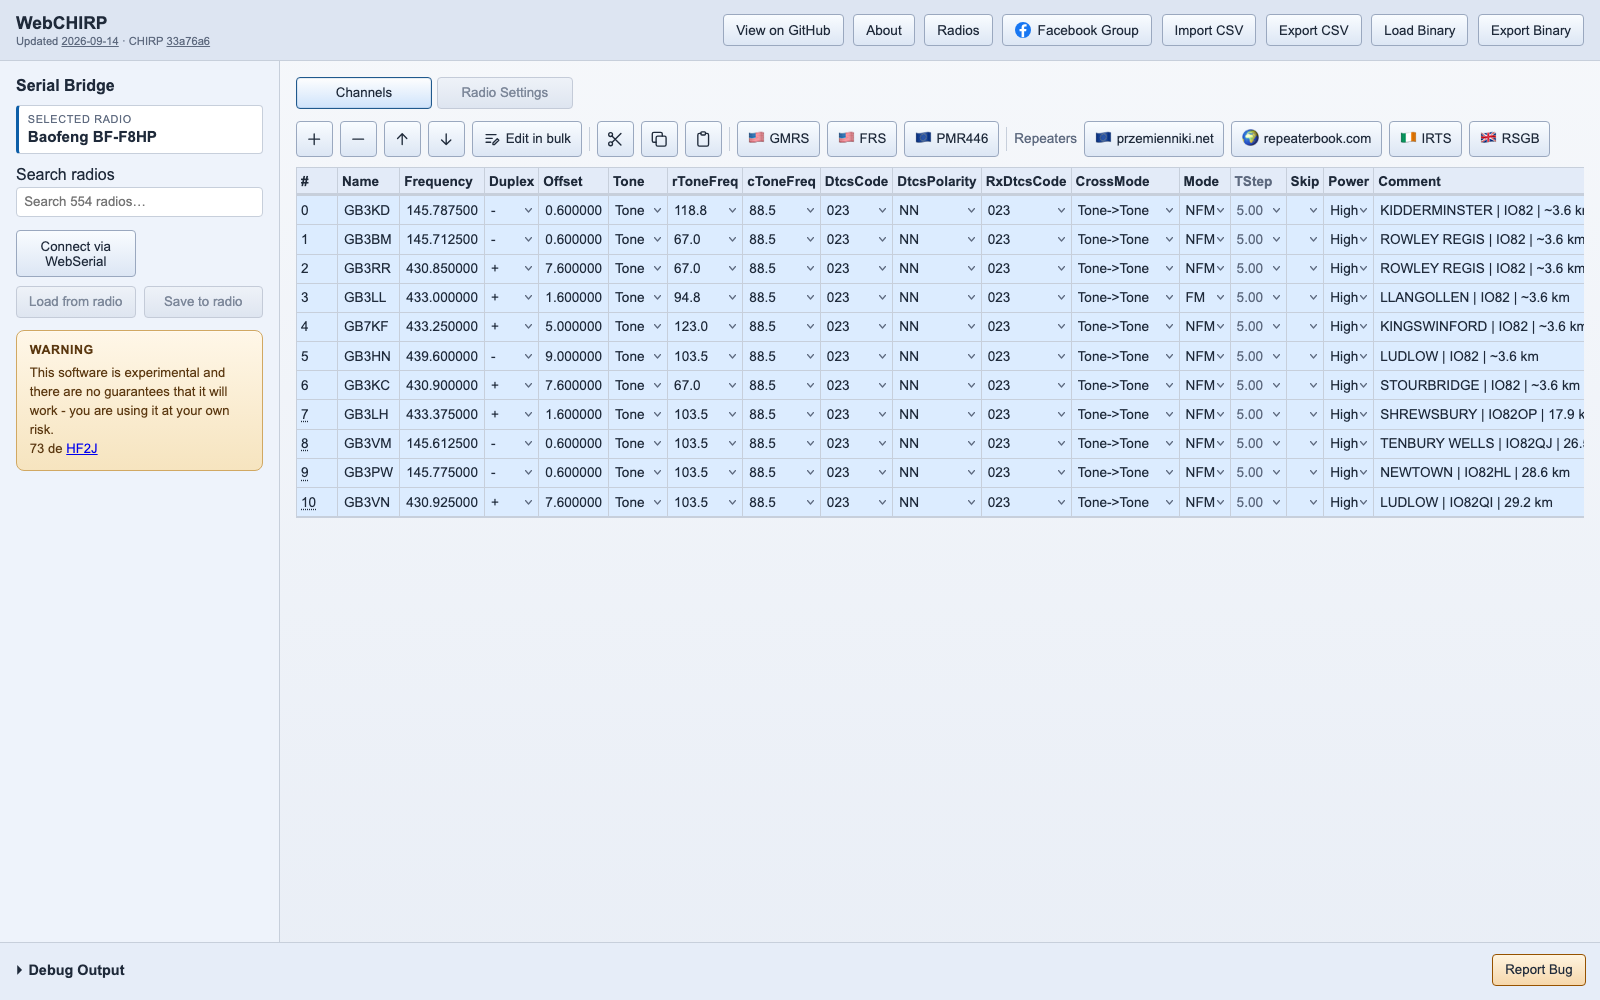
Quick Overview: What Is WebCHIRP?
- Zero-Installation Programming: Run authentic CHIRP radio drivers directly inside any Chromium-based browser (Google Chrome, Microsoft Edge, Brave, Opera) and on Chromebooks without installing desktop software or Python environments.
- WebAssembly Engine: Powered by Pyodide, compiling the official CPython runtime and Dan Planet’s open-source CHIRP radio drivers directly to WebAssembly (Wasm).
- Hardware Interfacing via Web APIs: Utilizes the Web Serial API for direct hardware communication on desktop operating systems and WebUSB on Android to bypass operating system kernel driver hurdles.
- Online Repeater Database Integration: Query and import live repeater directories directly from RepeaterBook.com, przemienniki.net (Poland), and IRTS (Ireland) into your codeplug memory channels.
- File Format Compatibility: Full support for importing and exporting standard CHIRP CSV spreadsheets as well as reading and writing raw binary radio clone images (
.img). - Progressive Web App (PWA): Installable as a standalone desktop application on Windows, macOS, Linux, ChromeOS, and Android with local offline operation.
- Client-Side Privacy: All radio memory operations, binary parsing, and serial communications execute entirely inside your local browser sandbox; no radio codeplug data is transmitted to external cloud servers.
What Is WebCHIRP?
WebCHIRP is an open-source, browser-based Customer Programming Software (CPS) that executes CHIRP radio drivers inside a client-side WebAssembly environment using Web Serial and WebUSB.
┌─────────────────────────────────────────────────────────────────────────┐
│                      WebCHIRP Architecture Diagram                      │
└─────────────────────────────────────────────────────────────────────────┘
                                     │
         ┌───────────────────────────┼───────────────────────────┐
         ▼                           ▼                           ▼
┌──────────────────┐       ┌──────────────────┐       ┌──────────────────┐
│  Browser Client  │       │  Pyodide Wasm    │       │  Physical Radio  │
│                  │       │                  │       │                  │
│ • UI Table / VFO │       │ • CPython Wasm   │       │ • USB-to-UART    │
│ • CSV Import/Exp │◄─────►│ • Official CHIRP │◄─────►│   (FTDI, CP2102, │
│ • RepeaterBook   │       │   Radio Drivers  │       │    CH340, PL2303)│
│ • Web Serial I/O │       │ • Stack Bridge   │       │ • Transceiver    │
└──────────────────┘       └──────────────────┘       └──────────────────┘
For more than a decade, CHIRP (created by Dan Smith, KK7DS) has served as the universal standard for programming handheld transceivers, mobile rigs, and base stations across the amateur radio community. However, setting up desktop programming tools often involves navigating operating system hurdles: installing Python dependencies, resolving GTK/wxPython runtime conflicts, overcoming macOS driver signing restrictions, and fixing corrupted USB-to-UART driver installations on Windows.
Developed by amateur radio operator Jan Szumiec (HF2J / M0NIT) and accessible at codeplug.org, WebCHIRP eliminates these setup obstacles completely. By porting CHIRP’s driver core into a browser-native WebAssembly runtime, WebCHIRP enables radio amateurs to connect a programming cable, plug in a radio, and write channels directly from a web page in seconds.
How It Works Under the Hood: WebAssembly Meets Web Serial
Running complex Python hardware drivers directly inside a web browser requires bridging two vastly different execution environments. WebCHIRP solves this challenge through a layered architectural stack:
┌─────────────────────────────────────────────────────────────────────────┐
│                         Technical Execution Stack                       │
├─────────────────────────────────────────────────────────────────────────┤
│                                                                         │
│  Layer 1: User Interface & State Management (TypeScript / HTML5)        │
│  • Reactive channel frequency grid and memory layout editor             │
│  • Live clone progress meters and serial communication logs             │
│                                                                         │
│  Layer 2: Pyodide WebAssembly Sandbox (Python 3.11+ in Wasm)            │
│  • Official CHIRP radio driver modules (drivers/uv5r.py, etc.)          │
│  • Bitwise memory mapping, checksum calculation, and binary packing     │
│                                                                         │
│  Layer 3: Asynchronous Serial Bridge (JSPI / Promise Integration)       │
│  • Bridges synchronous Python serial.read() calls to async Web APIs    │
│                                                                         │
│  Layer 4: Browser Hardware Transport APIs                               │
│  • Web Serial API (Desktop Chrome / Edge / Brave / ChromeOS)            │
│  • WebUSB API (Android Chrome user-space USB endpoint streaming)        │
│                                                                         │
└─────────────────────────────────────────────────────────────────────────┘
1. The Pyodide WebAssembly Runtime
WebCHIRP does not reinvent radio memory maps or write custom reverse-engineered protocols from scratch. Instead, it embeds Pyodide, a port of CPython to WebAssembly. The actual Python driver files from the upstream CHIRP project run unmodified inside your browser sandbox. When you select a radio model, the application loads the exact same driver logic that powers the desktop version of CHIRP.
2. The JavaScript Serial Bridge & JSPI
Desktop CHIRP drivers expect synchronous serial port communication (ser.read(), ser.write(), and ser.setDTR()). Modern web browsers, however, enforce non-blocking asynchronous APIs. WebCHIRP bridges this divide using WebAssembly JavaScript Promise Integration (JSPI) and stack switching, allowing synchronous Python driver loops to pause, await incoming bytes from the browser’s serial stream, and resume seamlessly without freezing the user interface.
3. Web Serial vs WebUSB
WebCHIRP supports two distinct hardware pathways:
- Web Serial API (Desktop): Direct connection to physical serial ports and USB-to-UART adapters (FTDI, Silicon Labs CP210x, WCH CH340, Prolific PL2303).
- WebUSB API (Android Mobile): Standard Android operating systems block direct access to
/dev/ttyUSBwithout root privileges. WebUSB communicates directly with the USB controller endpoints in user space, allowing Android smartphones and tablets to clone radios over USB-OTG cables.
Supported Radios and Clone Capabilities
WebCHIRP supports the vast catalog of clone-mode transceivers maintained by the CHIRP project, spanning dozens of popular manufacturers:
┌─────────────────────────────────────────────────────────────────────────┐
│                     Supported Transceiver Categories                    │
├──────────────────┬──────────────────────────────────────────────────────┤
│ Manufacturer     │ Popular Supported Models                             │
├──────────────────┼──────────────────────────────────────────────────────┤
│ Baofeng / Pofung │ UV-5R Series, UV-82, BF-888S, UV-13 Pro, UV-17, etc. │
│ Quansheng        │ UV-K5, UV-K5(8), UV-K6, UV-5R Plus, TG-UV2           │
│ Yaesu            │ FT-60R, FT-70D, FT-4XR, FT-65R, FT-270R, VX-6R       │
│ Icom             │ IC-V80, IC-2200H, IC-2300H, IC-T70A, IC-V8           │
│ AnyTone          │ AT-778UV, AT-5888UV, TERMN-8R, OBLTR-8R              │
│ Wouxun           │ KG-UVD1P, KG-UV6D, KG-UV8D, KG-UV9D Series           │
│ TYT              │ TH-UV88, TH-9800, TH-7800, TH-UVF9                   │
│ Radioddity       │ GA-510, GA-2S, GD-77 (Analog modes), DB25            │
│ Retevis          │ RT85, RT5R, RT22, RT21, H-777, RT98                  │
│ Tidradio         │ TD-H5, TD-H6, TD-H8 Series                           │
└──────────────────┴──────────────────────────────────────────────────────┘
Clone-Mode vs Live-Mode Radios: WebCHIRP is optimized for clone-mode radios (transceivers that download and upload their entire memory block in one batch). Real-time CAT-controlled “live-mode” transceivers (such as certain HF base stations that query channels one by one over continuous serial polling) are not currently supported in this web interface.
Step-by-Step Guide: Programming a Radio in WebCHIRP
Programming a radio using WebCHIRP requires only a compatible web browser and a standard programming cable.
┌─────────────────────────────────────────────────────────────────────────┐
│                    WebCHIRP 5-Step Programming Workflow                 │
└─────────────────────────────────────────────────────────────────────────┘
                                     │
┌──────────────┐     ┌──────────────┐     ┌──────────────┐     ┌──────────────┐     ┌──────────────┐
│  1. Connect  │────►│  2. Select   │────►│  3. Read &   │────►│  4. Edit &   │────►│  5. Write to │
│     Cable    │     │     Radio    │     │     Backup   │     │    Import    │     │     Radio    │
│  (WebSerial) │     │     Model    │     │  (.img file) │     │ (RepeaterBk) │     │  (Upload)    │
└──────────────┘     └──────────────┘     └──────────────┘     └──────────────┘     └──────────────┘
Step 1: Connect Your Programming Cable
- Plug your USB programming cable into your computer or Android device (via USB-OTG).
- Attach the radio connector firmly to your transceiver and power the radio on. Ensure the volume knob is set to roughly 70-80% on radios where the audio jack doubles as the data line (such as Baofeng and Kenwood 2-pin connectors).
Step 2: Open WebCHIRP and Select Your Model
- Navigate to https://codeplug.org/ in Chrome, Edge, or Brave.
- In the left-hand panel, use the Search radios box to find your exact make and model (for example, Baofeng UV-5R or Quansheng UV-K5).
Step 3: Read from Radio and Save a Backup
- Click Connect via WebSerial. Your browser will display a security prompt listing detected serial devices (e.g., CP2102 USB to UART Bridge Controller or USB-Serial Controller). Select your device and click Connect.
- Click Load from radio to initiate the download. A progress bar will track the memory block transfer.
- Once the clone completes, click Export Binary immediately to save an unaltered raw image backup (
.img) to your computer.
Step 4: Edit Channels or Import from RepeaterBook
- Manual Editing: Click any row in the spreadsheet to edit frequency, channel name, tone mode (CTCSS/DCS), transmit offset, power level, and bandwidth.
- Import from RepeaterBook: Open the query tool, enter your country, state, county, or grid square, and import local VHF/UHF repeaters directly into your memory list.
- Import CSV: Drag and drop existing CHIRP CSV channel lists directly into the browser window.
Step 5: Write the Codeplug Back to the Radio
- Verify all channel parameters, transmit offsets, and CTCSS access tones.
- Click Save to radio to write the updated memory block to the transceiver.
- Wait for the upload progress bar to reach 100%. Once finished, power cycle your radio to apply the new channel configuration.
Technical Comparison: WebCHIRP vs Other Programming Solutions
| Feature / Capability | WebCHIRP (codeplug.org) | Desktop CHIRP Next | RT Systems Software | OEM Factory CPS |
|---|---|---|---|---|
| Installation Required | None (Runs in Browser) | Python / Desktop App | Windows / Mac App | Windows App Only |
| Operating System Support | Win, Mac, Linux, ChromeOS, Android | Win, Mac, Linux | Win, Mac Only | Windows Only |
| Driver Configuration | Web Serial / WebUSB | OS Drivers Required | Proprietary Cables | Legacy Drivers |
| Chromebook Compatible | Native (Web Serial) | Linux Container | No | No |
| RepeaterBook Integration | Direct In-Browser Query | Built-in Query Tool | Built-in Query Tool | Manual Entry Only |
| File Format Support | CSV, Raw .img |
CSV, Raw .img |
Proprietary Formats | Model-Specific |
| Software License | Open Source (GPLv3) | Open Source (GPLv3) | Commercial Paid | Closed Freeware |
| Offline Functionality | Supported via PWA | Fully Offline | Fully Offline | Fully Offline |
Best Practices and Safety Guidelines
- Always Export an Original Backup First: Before making any channel changes, always perform a complete clone read and click Export Binary to preserve your factory calibration settings, squelch tables, and frequency limits.
- Use High-Quality Programming Cables: Inexpensive counterfeit USB cables with cloned Prolific chips can suffer from voltage drops or timing jitter during cloning. Cables featuring genuine FTDI or Silicon Labs CP2102 chipsets provide the most reliable serial transfers.
- Do Not Disconnect Mid-Transfer: Never unplug the programming cable or switch off the radio while the write progress bar is active. Interrupting a flash memory write can leave the radio in an unbootable state requiring recovery flashing.
- Inspect Browser Console for Diagnostics: If a clone operation stalls, press
F12to open your browser Developer Tools and inspect the console logs to view low-level serial frame exchanges and error responses.
Frequently Asked Questions (FAQ)
Is WebCHIRP safe to use with my radio?
Yes. WebCHIRP uses the official, battle-tested Python drivers from the upstream CHIRP project compiled into WebAssembly. Always save an initial binary backup (.img) of your radio memory before writing new channel data.
Which web browsers support WebCHIRP?
WebCHIRP requires browsers that support the Web Serial API and WebAssembly, including Google Chrome, Microsoft Edge, Brave, Opera, and Chromium on ChromeOS. Firefox and Safari currently do not support Web Serial.
Can I program my radio from a Chromebook?
Yes. WebCHIRP runs natively on Chromebooks without enabling Linux container mode. Simply plug your USB programming cable into the Chromebook and grant serial port access through Chrome.
How does WebCHIRP connect to radios on Android?
On Android, WebCHIRP uses the WebUSB API to communicate directly with USB-to-UART bridge chips over a USB-OTG adapter, bypassing Android operating system driver limitations without requiring root access.
Does WebCHIRP store my radio data or frequencies in the cloud?
No. All Python driver execution, codeplug parsing, and serial communication take place entirely inside your local browser’s WebAssembly sandbox. No codeplug data or channel lists are uploaded to remote servers.
Sources and Further Reading
- WebCHIRP Official Application Portal
- WebCHIRP Official GitHub Repository (jasiek/webchirp)
- CHIRP Official Open-Source Project
- RepeaterBook Worldwide Amateur Radio Repeater Directory
- W3C Web Serial API Specification
- Pyodide: Python with WebAssembly
- Jan Szumiec (HF2J / M0NIT) on QRZ
73 de 9M2PJU

Post Comment