Tiny ESP DeskBuddy: Build a Touch LCD Face Dashboard on the ESP32-C6
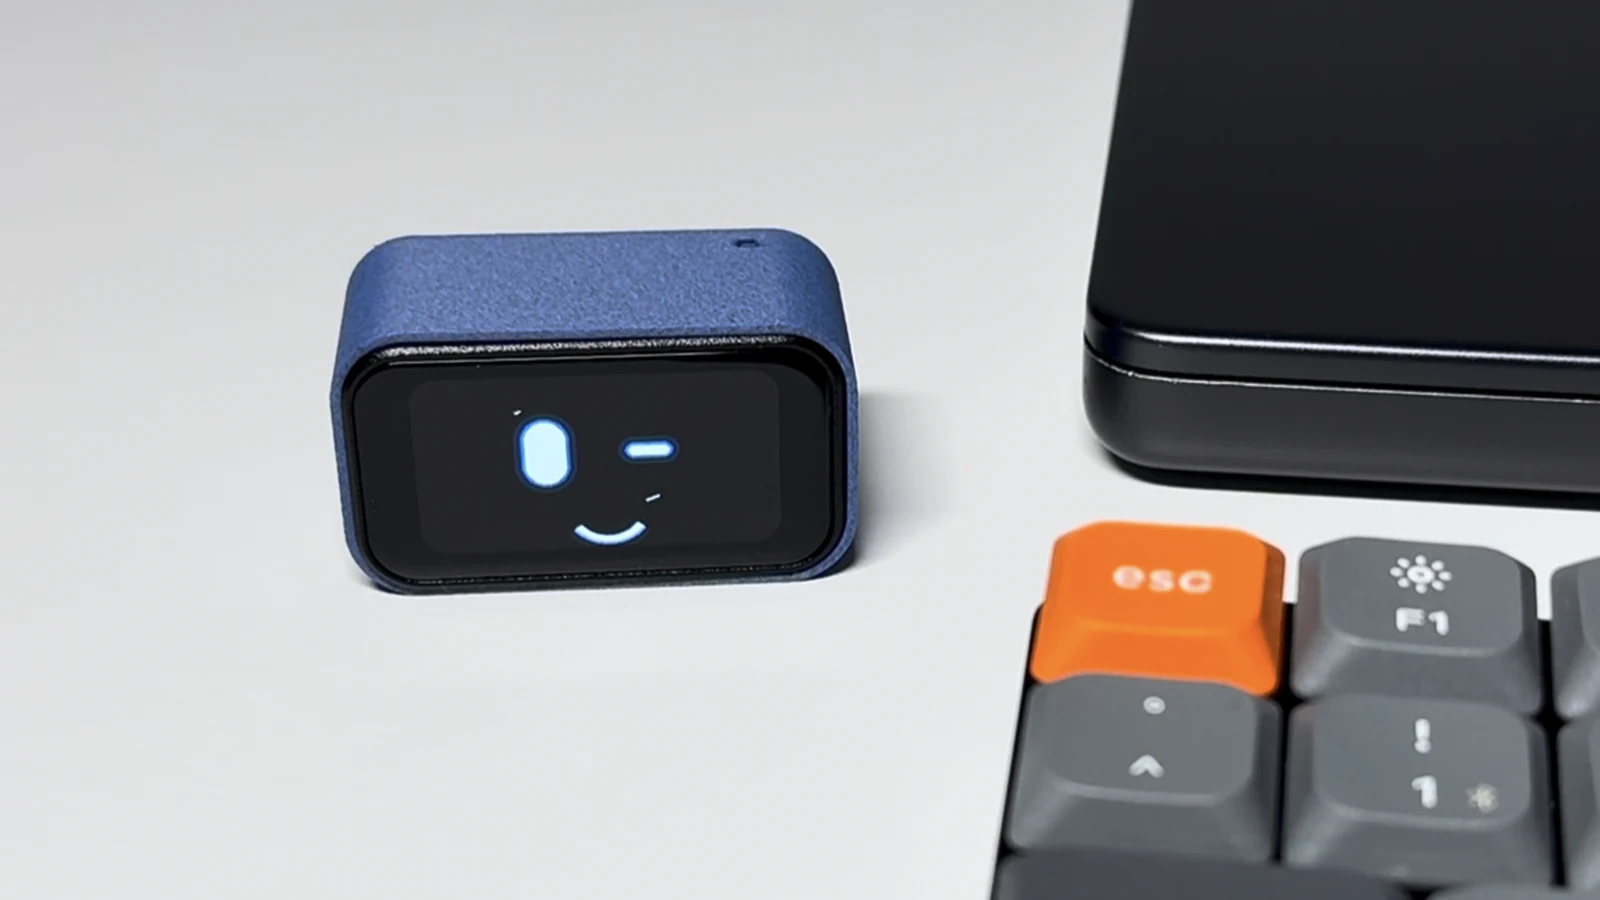
TL;DR: Schematik Tiny ESP DeskBuddy is a complete 45-minute build that turns the Waveshare ESP32-C6-Touch-LCD-1.47 into a palm-size desk companion: a monochrome animated face with five moods, swipeable pages for clock, date, weather, moon phase, stock price, and GitHub stats, all driven by touch, an IMU, and free no-key web APIs. The full Arduino sketch, wiring map, and printable shell are published with the guide. If you want a first ESP32-C6 project that teaches display, touch, IMU, and WiFi data in one sitting, this is it.
Some gadgets earn their desk space by being useful. Others earn it by having a face. The Tiny ESP DeskBuddy manages both: a 1.47 inch touch display that blinks at you, follows your tilt like a curious pet, and then swipes sideways into a genuinely handy dashboard of time, weather, moon phase, your stock, and your GitHub follower count. It runs on one of the cheapest modern Espressif boards, needs no external wiring at all, and the entire firmware is published as a single Arduino sketch you can read in an evening.
This guide covers what the DeskBuddy is, the ESP32-C6 hardware that makes it possible, exactly what the firmware does across its seven pages, a tour of the code techniques worth stealing for your own projects, the 45-minute build from flashing to printed shell, what the Schematik platform behind it is, how it compares against its rivals, the honest limits, and why amateur radio operators should care about a desk toy.
What Is the Tiny ESP DeskBuddy?
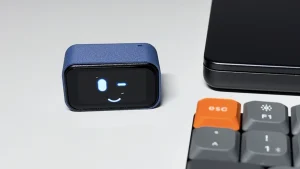
The Tiny ESP DeskBuddy is a palm-size desk gadget built on the Waveshare ESP32-C6-Touch-LCD-1.47 that shows an animated black-and-white face with five expressions and swipeable dashboard pages for clock, date, weather, moon phase, stock quote, and GitHub statistics.
It comes from Schematik, a community electronics project platform, as an Intermediate difficulty build rated at about 45 minutes. The concept is deliberately simple: a face for charm, data pages for utility, touch and tilt for interaction, and WiFi for live content. Tap the face to cycle its five expressions. Tilt the board and the eyes drift after your movement via the onboard IMU. Swipe left and right through Time, Date, Weather, Moon, Stock, and GitHub pages. Leave it alone for 8 seconds and it starts auto-cycling pages by itself like a tiny exhibition stand.
The Hardware: an ESP32-C6 Board in 44 Millimeters
Everything runs on one self-contained Waveshare module, which is why the parts list is two lines long and the wiring section is empty.
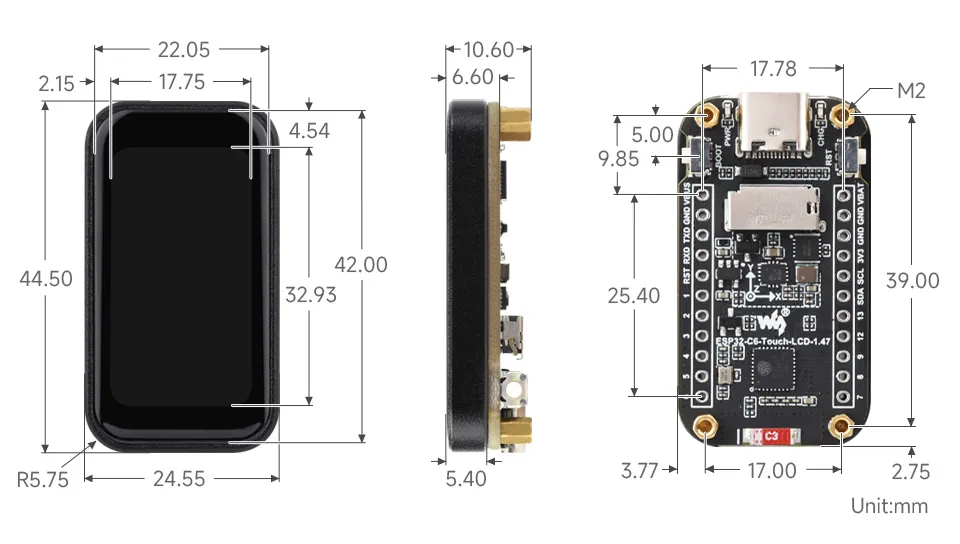
The board packs a surprising amount of hardware into a 44.5 by 24.55 mm footprint:
| Subsystem | Specification |
|---|---|
| Main chip | ESP32-C6 (RISC-V 160 MHz, WiFi 6, 802.15.4 for Zigbee, Thread, and Matter) |
| Display | 1.47 inch IPS LCD, 172 by 320 pixels, SPI on GPIO 1, 2, 14, 15, 22, 23 |
| Touch | AXS5106L capacitive touch controller, I2C on GPIO 18 and 19, RST on GPIO 20, INT on GPIO 21 |
| Motion | QMI8658 6-axis IMU at I2C address 0x6B on the shared GPIO 18 and 19 bus |
| USB | Native USB-C serial (requires CDC on Boot for the Serial monitor) |
| Power | LiPo battery socket plus USB-C charging, BOOT and RST buttons |
| Mounting | M2 holes and castellated side headers for soldering into projects |
The ESP32-C6 itself is worth a paragraph. It is Espressif first RISC-V mainline part with WiFi 6, and the only cheap Espressif chip with an 802.15.4 radio for Zigbee, Thread, and Matter. For this project the 802.15.4 side sleeps unused, but it means the same 15 dollar class board in your DeskBuddy can later join a Thread sensor mesh or speak Zigbee with zero hardware changes. Buy the board from the Schematik parts page, add a small 3.7 V LiPo in the 300 to 500 mAh range, and print the DeskBuddy shell STL with a clean front window and a USB-C cutout.
What the Firmware Does Across Seven Pages
The published schematik_esp32.ino sketch is one self-contained file with seven jobs, and it is written to be read, not just flashed.
Page 0, the face. Two tall rounded white eyes on black, a small mouth, page dots, and a subtle header. Tap anywhere to cycle five moods: normal, happy, surprised, flat, and skewed. The eyes blink on a randomized timer, glance around on their own, breathe with a subtle size pulse, and dilate the pupils on tap. Tilt the board and the pupils drift with a linear map of the accelerometer. Spin it fast and the gyro spike triggers the surprised face automatically.
Pages 1 and 2, clock and date. A big 7-segment style clock and a full date page with weekday. Both run off a compile-time timestamp seed, so the clock starts immediately at boot even with no WiFi configured. No RTC chip, no NTP dependency for basic operation.
Page 3, weather. Live data from Open-Meteo (free, no API key) with a drawn sun, cloud, rain, snow, and storm icon set, temperature, humidity, and wind. The default location in the starter sketch is New York, one constant to change for your own town.
Page 4, moon. A computed moon phase disc with age in days and illumination percent, calculated onboard from the date with the 29.53 day synodic cycle. No network needed at all.
Page 5, stocks. Apple (AAPL) quote from the Stooq free CSV endpoint with price, open, high, low, and quote time. Same fetch-and-render pattern as weather, so any ticker or second symbol slots straight in.
Page 6, GitHub. Follower and public repo counts for the username in the config, pulled from the GitHub Users API with a proper User-Agent header. Vanity metrics as ambient decor, and oddly motivating.
Underneath it all. IMU calibration with a hold-still prompt at startup, app and mood state reported over USB Serial at 115200 baud every 1.2 seconds, an 8-second auto page advance, and clear setup messages on network pages when credentials are missing instead of silent failure.
The Code Tour: Five Techniques Worth Stealing
You can build the gadget without reading a line, but the sketch repays study. Five patterns transfer directly to any ESP32 display project.
1. An inlined touch driver instead of a library. The AXS5106L reader is written directly into the sketch: I2C at 400 kHz to 7-bit address 0x63, a 6-byte frame from register 0x01, first-point extraction with edge dead-zone compensation and per-rotation axis mapping. No ESP-IDF or LVGL touch stack required. If your display project only needs tap and swipe, this is the template.
2. Graceful IMU fallback. The QMI8658 is probed by its WHO_AM_I register at 0x6B. Present means tilt-reactive eyes with exponential filtering and a shared-bus reset routine if I2C sticks. Absent means a sinusoidal animation takes over and the face still works. Hardware-optional features should always degrade like this.
3. Compile-time clock seeding. __DATE__ and __TIME__ macros plus a days-from-civil conversion give a plausible wall clock from the first second of boot. NTP can refine it later, but the gadget is never dead on arrival.
4. CDC on Boot, stated twice. The guide warns in two separate places that the native USB-C port needs CDC on Boot enabled (or -DARDUINO_USB_CDC_ON_BOOT=1 in build flags) or Serial shows nothing. Every native-USB ESP32 project should carry this warning.
5. One fetch function plus one render function per data page. Weather, stock, and GitHub all follow the identical shape, and the page loop refreshes each on its own interval (15, 10, and 30 minutes). Adding a CO2 reading, a server ping, or a countdown page means writing two functions and wiring them into the loop.
The external dependencies are just three libraries: GFX Library for Arduino for drawing, ArduinoJson for API parsing, and FastIMU for the sensor math.
Build It in 45 Minutes
The guide structures the build as five steps, and the honest total is one evening including the print.
1. Prepare the shell. Print a DeskBuddy style enclosure with a front window for the 1.47 inch display and a USB-C cutout at the bottom. PLA or PETG both work, and a black front bezel gives the best contrast against the white-on-black display. Leave clearance behind the board for the LiPo.
2. Configure the sketch. Fill in WIFI_SSID, WIFI_PASSWORD, and GITHUB_USER at the top of the starter sketch. Blank WiFi is fine for a first flash: the gadget runs and network pages show a setup message.
3. Flash the board. No wiring, everything is on the module. Connect USB-C, open the Schematik Deploy panel and press Deploy, or use PlatformIO with the esp32-c6-devkitc-1 board target. If the upload stalls, hold BOOT, press Reset, and release BOOT once flashing starts.
4. Verify face and touch. Tap to cycle the five expressions, swipe through all seven pages, tilt to check eye drift, and open Serial Monitor at 115200 baud for the calibration message and the app and mood heartbeat lines.
5. Fit the battery and close up. Connect the LiPo to the JST socket, tuck it behind the module, keep the USB-C reachable for charging and updates, and never pinch or puncture the cell closing the shell.
The troubleshooting section covers the classic failures: silent Serial (CDC on Boot), sine-wave eyes (IMU not at 0x6B), setup messages (bad secrets.h), missing ports (download mode dance), warm LiPo (normal within reason), and dead touch zones (GPIO 20 and 21 reassignment conflicts).
What Is Schematik?
Schematik is a community electronics project platform: guided builds with parts lists, wiring maps, firmware, and one-click deploy, plus a parts catalog and a starter kit program. The DeskBuddy page is representative of the format: what you’ll build, the firmware job list, upload and calibration instructions, troubleshooting for the failures the author actually hit, going-further extension notes, a parts list with links, assembly steps with tips and warnings, a pin connection table, the complete sketch inline, and the STL file. It reads like documentation written after building the thing three times, which is the highest compliment a build guide can get.
DeskBuddy Versus the Alternatives
No gadget exists in a vacuum. The honest comparison depends on whether you want a project or a product.
| Category | Tiny ESP DeskBuddy (ESP32-C6) | CYD Ham Dashboard (ESP32 2432S028R) | LaMetric TIME (commercial) |
|---|---|---|---|
| Price class | Budget module plus printed shell | Around 10 dollars plus print | Around 200 dollars retail |
| Display | 1.47 inch 172 by 320 touch IPS | 2.8 inch 320 by 240 touch TFT | 37 by 8 LED matrix |
| Controls | Touch swipe plus tap plus IMU tilt | Touchscreen pages | Buttons plus phone app |
| Data | Open-Meteo, Stooq, GitHub, all editable | HamQSL propagation, PSKReporter, DX cluster | Apps plus IFTTT and widgets |
| Build vs buy | Full build, full source, 45 minutes | Full build, full source | Unbox and configure |
| Extensibility | Add any page in two functions | Add any dashboard screen | Limited to the app store |
| Best for | Learning display, touch, IMU, and APIs | Shack propagation wall | Zero-effort desk notifications |
Our CYD Ham Dashboard guide covers the closest sibling: a 10 dollar Cheap Yellow Display running ham-specific screens. Build the DeskBuddy first to learn the techniques, then build the CYD to serve the shack.
Honest Limits
A 45-minute build has 45-minute boundaries, and the guide states most of them.
- The C6 radio extras go unused. Zigbee, Thread, and Matter sit idle in this firmware. If you need 802.15.4 on day one, this sketch is a starting point, not a finished radio project.
- No OTA updates. New pages mean USB-C and a reflash. Fine for a desk toy, worth knowing before you gift ten of them.
- Single board only. No multi-board networking, no external sensors or displays in the starter. The castellated headers invite expansion, but you design it.
- Weather defaults to New York. One constant to change, but every photo in every show will show New York until you do.
- Battery life is hours, not days. A 300 to 500 mAh cell matches the shell, and the bright IPS panel drinks. This is a desk gadget with a battery option, not a field instrument.
- Credentials live in the sketch. Acceptable for a desk toy on your own network, but don’t publish your edited sketch, and use a guest IoT SSID if your router offers one.
Why It Matters for Ham Radio
This is a maker desk toy, not ham gear, and this section isn’t going to pretend otherwise. It matters for three transferable reasons.
First, the shack needs exactly this kind of ambient display. A DeskBuddy on the bench showing time, local weather, and moon phase next to the rig is genuinely useful, and the fetch-and-render pattern ports straight to ham data: swap the stock page for a DX cluster snapshot or a solar flux readout and the gadget becomes shack furniture. Our 9M2PJU HamClock guide shows where that road leads at full scale.
Second, the techniques are the curriculum. Inline touch drivers, IMU fallback behavior, compile-time clock seeding, and no-key API integration are the same skills behind every shack touchscreen panel from CYD dashboards to antenna controllers. An evening with this sketch teaches all four with a face that reacts when you get it right.
Third, the ESP32-C6 is the future shack sensor radio. WiFi 6 plus 802.15.4 on a 15 dollar class board means the next generation of wireless shack sensors, antenna switches, and station monitors will speak Thread, Matter, or Zigbee. Learning the C6 now on a friendly display project beats learning it later on a live station controller.
Sources and Further Reading
- Tiny ESP DeskBuddy build guide on Schematik
- Waveshare ESP32-C6-Touch-LCD-1.47 parts page on Schematik
- DeskBuddy 3D printable shell STL
- ESP32-C6-Touch-LCD-1.47 wiki from Waveshare
- ESP32-C6 RISC-V SoC from Espressif
- GFX Library for Arduino
- ArduinoJson library
- FastIMU sensor library
- Open-Meteo free weather API
- Stooq free market data
- GitHub REST API: get a user
- PlatformIO embedded development platform
- CYD Ham Dashboard touchscreen shack monitor
- 9M2PJU HamClock space weather dashboard
73 de 9M2PJU

Post Comment