Home Assistant Architecture, Best Hardware, and Installation Guide: Building a Local-First Smart Home and Radio Shack Automation Hub
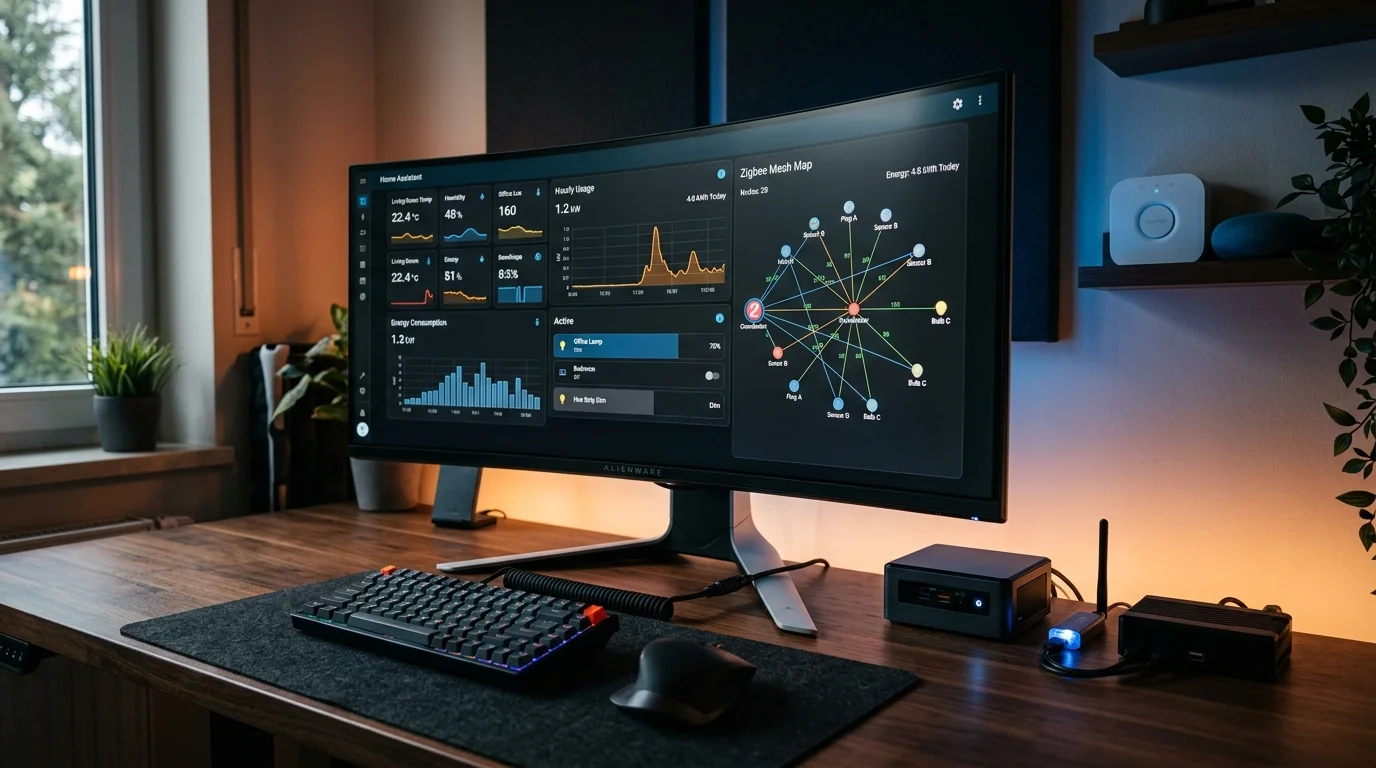
TL;DR: Home Assistant is the gold standard for open-source, local-first home and station automation. For the most stable experience in 2026, install Home Assistant Operating System (HAOS) directly on an Intel Processor N100 mini PC (or virtualized on Proxmox VE 8) equipped with at least 8 GB to 16 GB of RAM and a fast NVMe SSD. Avoid running Home Assistant on micro-SD cards, unmonitored cloud servers, or complex Python virtual environments. Connect your smart devices using a dedicated Sonoff Zigbee 3.0 USB Dongle Plus on a shielded USB 2.0 extension cable, keep your database lean with recorder exclusions, and expose remote dashboards securely through Cloudflare Tunnel or Tailscale rather than raw port forwarding.
What Is Home Assistant?
Home Assistant is an open-source, local-first home automation platform that consolidates thousands of disparate smart device protocols, hubs, and cloud services into a unified, privacy-focused control system running entirely on your local hardware.
+---------------------------------------------------------------------------------------------------+
|                                  HOME ASSISTANT ECOSYSTEM TOPOLOGY                                |
+---------------------------------------------------------------------------------------------------+

 [ Smart Devices & Radios ]           [ Physical Hardware Layer ]         [ Home Assistant OS Engine ]
 ┌────────────────────────┐             ┌────────────────────────┐          ┌───────────────────────┐
 │ Zigbee (Sensors/Plugs) │ ──Zigbee──► │ USB Coordinator Dongle │ ──USB──► │ Zigbee2MQTT / ZHA     │
 └────────────────────────┘             │ (Sonoff / ZBT-1 Dongle)│          └───────────┬───────────┘
 ┌────────────────────────┐             └────────────────────────┘                      │
 │ ESPHome / Tasmota DIY  │ ──Wi-Fi/LAN───────────────────────────────────────► ┌───────▼───────────┐
 └────────────────────────┘                                                     │ Core Event Bus    │
 ┌────────────────────────┐                                                     │ - State Machine   │
 │ Matter & Thread Nodes  │ ──Thread/IP───────────────────────────────────────► │ - Automation Core │
 └────────────────────────┘                                                     │ - SQLite Database │
 ┌────────────────────────┐             ┌────────────────────────┐              └───────┬───────────┘
 │ Radio Shack Gear       │ ──Serial──► │ USB-to-UART / RS-232   │                      │
 │ (Rig, Rotator, Relays) │ ──TCP/IP──► │ Ethernet Shack LAN     │ ──MQTT/REST──────────┤
 └────────────────────────┘             └────────────────────────┘                      │
 ┌────────────────────────┐                                                             │
 │ Solar & Battery Bank   │ ──VE.Direct► Victron USB Interface  ──USB/BLE───────────────┘
 └────────────────────────┘                                                             │
                                                                                        ▼
 [ Remote & User Dashboards ]                                           ┌───────────────────────────┐
 ┌────────────────────────┐                                             │ Lovelace UI & Supervisors │
 │ Cloudflare Zero Trust  │ ◄──Encrypted Tunnel (cloudflared)──────────┤ - Mobile Companion Apps   │
 └────────────────────────┘                                             │ - Wall Tablets & Kiosks   │
 ┌────────────────────────┐                                             │ - Automated Backups       │
 │ Tailscale VPN Mesh     │ ◄──WireGuard Tunnel────────────────────────┤ - Add-on Container Engine │
 └────────────────────────┘                                             └───────────────────────────┘
Most proprietary smart home ecosystems-such as Tuya, Google Home, Amazon Alexa, and Apple HomeKit-depend on remote manufacturer cloud servers to process automation logic. When internet service drops, or when a vendor decides to sunset an API, shut down backend infrastructure, or levy monthly subscription fees, your smart hardware abruptly turns into electronic scrap.
Home Assistant flips this dynamic upside down. Originally created by Paulus Schoutsen in 2013, Home Assistant executes all automation scripts, triggers, timers, and state checks strictly inside your own local network. It talks directly to hardware over local IP sockets, serial connections, Zigbee, Z-Wave, Bluetooth Low Energy (BLE), and Matter. The system continues operating smoothly during internet outages, safeguards your family privacy, and bridges hardware across rival manufacturers into one clean dashboard.
The Four Home Assistant Installation Methods: Architectural Breakdown
Home Assistant distributes software through four distinct architectures. Picking the wrong installation path is the number one cause of frustration, broken updates, and unnecessary maintenance.
┌──────────────────────────────────────────────────────────────────────────────────────────────────┐
│                            HOME ASSISTANT INSTALLATION ARCHITECTURES                             │
├────────────────────────────┬─────────────────────────────┬───────────────────────────────────────┤
│ Installation Method        │ Underlying Operating System │ Supervisor & Add-on Store Included?   │
├────────────────────────────┼─────────────────────────────┼───────────────────────────────────────┤
│ 1. Home Assistant OS (HAOS)│ Custom Embedded Linux       │ YES (Full Supervisor, 1-click Add-ons)│
├────────────────────────────┼─────────────────────────────┼───────────────────────────────────────┤
│ 2. Home Assistant Container│ Any Linux Distro with Docker│ NO  (Manual Docker containers needed) │
├────────────────────────────┼─────────────────────────────┼───────────────────────────────────────┤
│ 3. Home Assistant Supervise│ Strict Debian Linux Only    │ YES (Fragile, high maintenance)       │
├────────────────────────────┼─────────────────────────────┼───────────────────────────────────────┤
│ 4. Home Assistant Core     │ Python 3.12+ Virtualenv     │ NO  (Zero supervisor, developer only) │
└────────────────────────────┴─────────────────────────────┴───────────────────────────────────────┘
1. Home Assistant Operating System (HAOS) – The Gold Standard
HAOS is a dedicated, minimal, appliance-style operating system built on Buildroot and Linux. It boots directly into the Home Assistant Supervisor engine, which orchestrates the Core application container, the audio subsystem, local DNS, and user-selected Add-ons (such as Mosquitto MQTT broker, Zigbee2MQTT, Node-RED, and ESPHome) in isolated Docker containers behind the scenes.
- Why it wins: You get automated single-click OS and application updates, built-in system snapshots, integrated local backups, hardware driver auto-detection, and access to the complete official Add-on store.
- Best deployment: Bare metal on a dedicated mini PC, or as a virtual machine (KVM / QEMU) inside Proxmox VE.
2. Home Assistant Container
This method runs the Home Assistant Core Docker container on top of your existing Linux host (such as Ubuntu Server, Debian, or DietPi).
- The trade-off: You don’t get the Supervisor or the Add-on Store. If you need an MQTT broker or Zigbee2MQTT, you must write your own Docker Compose files, configure persistent volumes, wire bridge networks, and maintain container updates manually.
- Best deployment: Users who already manage a dedicated Docker/Portainer media server and don’t want a separate virtual machine.
3. Home Assistant Supervised
This hybrid method attempts to give you the Supervisor and Add-on store on top of a standard Linux distribution.
- The warning: Home Assistant enforces strict architectural compliance rules on Supervised installations. You must run vanilla Debian without external software repositories or unauthorized packages. Installing common server tools like Plex, Pi-hole, or custom network managers will instantly flag your installation as “Unsupported” or “Unhealthy”, blocking future Core updates. Avoid this method unless you are an advanced Linux system administrator.
4. Home Assistant Core
Home Assistant Core installs the bare Python package inside a Python virtual environment (venv).
- The reality: You must manually install Python 3.12 or 3.13, compile build dependencies, configure systemd service units, and compile complex C wheels. You receive no Supervisor, no container isolation, and no Add-on store. This method is suited exclusively for core software developers and integration maintainers.
Installation Methods Comparison
| Feature | HAOS (Recommended) | Container (Docker) | Supervised | Core (Python venv) |
|---|---|---|---|---|
| Target Host | Bare metal or VM | Linux + Docker Engine | Pure Debian Linux | Any OS with Python 3.12+ |
| Supervisor Engine | Built-in | None | Built-in | None |
| Add-on Store | 1-Click install | Manual Docker compose | 1-Click install | Manual installation |
| OS / Kernel Updates | Fully automated | Manual host updates | Manual Debian updates | Manual host updates |
| Full Backups & Restore | Native 1-click | Manual volume backup | Native 1-click | Manual file copies |
| Maintenance Burden | Minimal | Moderate | High (Compliance rules) | Very High |
| Recommended For | 95% of all users | Experienced Docker users | Specialists only | Core developers |
Hardware Guide: What Should You Run Home Assistant On?
A decade ago, everyone installed Home Assistant on a Raspberry Pi 3. Today, Home Assistant manages relational databases, high-frequency MQTT sensor feeds, real-time energy analytics, local voice assistants, and camera AI detection. Choosing the right physical host determines whether your smart home feels instantaneous or sluggish.
┌──────────────────────────────────────────────────────────────────────────────────────────────────┐
│                             HARDWARE PLATFORM VALUE MATRIX (2026)                                │
├───────────────────────────────┬─────────────────────────────┬────────────────────────────────────┤
│ Hardware Candidate            │ Power Draw (Idle)           │ Storage & Reliability Rating       │
├───────────────────────────────┼─────────────────────────────┼────────────────────────────────────┤
│ Intel N100 / N95 Mini PC      │ 5W to 7W                    │ Outstanding (M.2 NVMe SSD)         │
├───────────────────────────────┼─────────────────────────────┼────────────────────────────────────┤
│ Raspberry Pi 5 (with NVMe HAT)│ 4W to 6W                    │ Very Good (PCIe NVMe SSD)          │
├───────────────────────────────┼─────────────────────────────┼────────────────────────────────────┤
│ Home Assistant Green          │ 2W to 3W                    │ Good (Onboard eMMC Flash)          │
├───────────────────────────────┼─────────────────────────────┼────────────────────────────────────┤
│ Used 1-Litre Thin Client      │ 9W to 14W                   │ Outstanding (SATA / NVMe SSD)      │
├───────────────────────────────┼─────────────────────────────┼────────────────────────────────────┤
│ Raspberry Pi 4 / 3 (SD Card)  │ 3W to 5W                    │ POOR (High SD wear & corruption)   │
└───────────────────────────────┴─────────────────────────────┴────────────────────────────────────┘
Tier 1 Champion: Intel Processor N100 Mini PCs
Small form factor x86-64 mini PCs-such as the Beelink Mini S12 Pro, GMKtec NucBox G3, and Trigkey Green G4-represent the uncontested value sweet spot for Home Assistant.
- Performance: Quad-core Alder Lake-N architecture operating up to 3.4 GHz provides massive compute headroom compared to ARM SBCs.
- Storage Reliability: Ships standard with high-speed M.2 PCIe NVMe SSDs. You never have to worry about flash memory burnouts caused by SQLite database write transactions.
- Expandability: 8 GB or 16 GB of DDR4/DDR5 RAM allows you to install Proxmox VE, host HAOS in a virtual machine, and run parallel containers for Pi-hole, AdGuard Home, or a local audio server without breaking a sweat.
- Energy Consumption: Idles at an astonishingly low 5 to 7 Watts, adding less than a couple of dollars to your monthly utility bill.
- Video Decoding: Includes Intel UHD Graphics with Intel QuickSync, providing hardware-accelerated video decoding if you later run Frigate NVR or local object detection.
Tier 2: Raspberry Pi 5 (With NVMe Base HAT)
The Raspberry Pi 5 is a capable platform, featuring a 2.4 GHz quad-core Cortex-A76 processor and a dedicated single-lane PCIe 2.0 interface.
- The Catch: Once you purchase a Raspberry Pi 5 board, the official power supply, an aluminum heatsink case, and an M.2 NVMe bottom expansion board (like the Pimoroni NVMe Base or Geekworm X1001), your total investment often matches or exceeds the price of an Intel N100 mini PC. If you already own a Pi 5, pairing it with an NVMe drive produces a snappy, rock-solid HAOS appliance.
Tier 3: Turnkey Hardware (Home Assistant Green & Yellow)
Nabu Casa (the commercial entity backing Home Assistant) offers two official hardware products:
- Home Assistant Green: An affordable ($99) entry-level appliance powered by a Rockchip RK3566 quad-core ARM processor, 4 GB RAM, and 32 GB of onboard eMMC storage. It arrives with HAOS pre-flashed. It’s the best gift for beginners who don’t want to flash drives or fiddle with computer hardware.
- Home Assistant Yellow: A carrier board for the Raspberry Pi Compute Module 4 (CM4) featuring an integrated Silicon Labs Zigbee/Thread radio and M.2 NVMe slot. It’s an elegant all-in-one package, though availability and CM4 module pricing fluctuate.
Tier 4: Used Enterprise 1-Litre Desktop Mini PCs
If budget is tight, browse secondhand marketplaces for off-lease 1-litre corporate desktops:
* HP EliteDesk 800 G3 / G4 Mini
* Lenovo ThinkCentre M710q / M720q Tiny
* Dell OptiPlex 3050 / 7050 Micro
Equipped with 6th to 8th generation Intel Core i3 or i5 processors, 8 GB RAM, and internal SSDs, these workstations sell for $50 to $80. They consume slightly more idle power (9W to 14W) than an N100. But offer industrial durability, socketed memory slots, and dual display outputs.
What NOT to Run Home Assistant On
- Micro-SD Cards on Any Single Board Computer: Home Assistant writes state history every few seconds into an internal SQLite database. Standard consumer micro-SD cards lack write wear-leveling controllers and usually fail within 6 to 18 months, leading to sudden boot failures and data loss.
- Shared Remote Cloud VPS (e.g., FreeBSD maksiat or Unrouted Cloud Hosts): Deploying Home Assistant on a remote cloud server far from your home introduces latency, severs local broadcast discovery (mDNS and SSDP), prevents you from plugging in USB Zigbee or Z-Wave dongles, and leaves you stranded when your internet connection drops.
Hardware Showdown Comparison
| Hardware Platform | CPU Architecture | Idle Power | Storage Medium | Expandability | Typical Price | Verdict |
|---|---|---|---|---|---|---|
| Intel N100 Mini PC | 4-Core x86_64 (Alder Lake) | 5W – 7W | M.2 NVMe PCIe SSD | Up to 16GB RAM + 2TB NVMe | $120 – $160 | Best Overall Winner |
| Raspberry Pi 5 | 4-Core ARM64 (Cortex-A76) | 4W – 6W | PCIe NVMe (with HAT) | Fixed RAM (4GB/8GB) | $110 – $140 | Excellent if already owned |
| Home Assistant Green | 4-Core ARM64 (RK3566) | 2W – 3W | 32GB Onboard eMMC | Fixed 4GB RAM | $99 | Best plug-and-play beginner |
| Used 1L Thin Client | Intel Core i5 (6th-8th Gen) | 9W – 14W | SATA or NVMe SSD | Up to 32GB RAM | $50 – $80 | Best tight-budget powerhouse |
| Raspberry Pi 3 / 4 | 4-Core ARM64 (Old) | 3W – 5W | Micro-SD Card | None | $45 – $75 | Do not use (SD wear failure) |
Essential RF Coordinators: Zigbee, Z-Wave, and Matter/Thread
Smart bulbs, door contact sensors, presence sensors, and power plugs shouldn’t live on your household Wi-Fi network. Cheap 2.4 GHz Wi-Fi IoT devices congest router client tables, broadcast continuous broadcast packets, and often tether back to overseas cloud backends.
Instead, build your local smart home around a dedicated Zigbee 3.0 or Thread/Matter mesh network.
┌──────────────────────────────────────────────────────────────────────────────────────────────────┐
│                            THE CRITICAL USB EXTENSION CABLE RULE                                 │
├──────────────────────────────────────────────────────────────────────────────────────────────────┤
│                                                                                                  │
│  [ Mini PC / USB 3.0 Port ]                                                                     │
│  ┌───────────────────────┐                                                                       │
│  │ Emits broadband RF    │                                                                       │
│  │ noise across 2.40 GHz │                                                                       │
│  │ to 2.50 GHz band      │                                                                       │
│  └───────────┬───────────┘                                                                       │
│              │                                                                                   │
│              │ ◄── 1.0m to 1.5m Shielded USB 2.0 Extension Cable (Required!)                     │
│              │                                                                                   │
│  ┌───────────▼───────────┐                                                                       │
│  │ Sonoff Dongle Plus    │ ── Clean 2.4 GHz Zigbee Signal (Channel 15, 20, or 25)                │
│  │ (CC2652P / EFR32MG21) │    No dropped packets, 30+ meter mesh reach                           │
│  └───────────────────────┘                                                                       │
│                                                                                                  │
└──────────────────────────────────────────────────────────────────────────────────────────────────┘
Recommended USB Radio Dongles
- Sonoff Zigbee 3.0 USB Dongle Plus-P (ZBDongle-P): Powered by the Texas Instruments CC2652P microcontroller with a +20dBm power amplifier and external dipole antenna. It runs standard Z-Stack coordinator firmware and represents the most stable coordinator for both Zigbee2MQTT and Home Assistant’s native ZHA (Zigbee Home Automation).
- Sonoff Zigbee 3.0 USB Dongle Plus-E (ZBDongle-E): Powered by the Silicon Labs EFR32MG21 chip. Highly capable, with experimental support for multiprotocol Zigbee and Thread operations.
- Home Assistant Connect ZBT-1 (Formerly SkyConnect): Official Nabu Casa hardware featuring Silicon Labs hardware designed for smooth Matter/Thread and Zigbee connectivity.
The Golden Rule: Always Use a USB Extension Cable
Never plug a Zigbee, Z-Wave, or Thread USB coordinator directly into a USB 3.0 port on your computer.
The USB 3.0 specification creates broad-spectrum electromagnetic interference (EMI) radiating across the entire 2.4 GHz to 2.5 GHz radio band. Because Zigbee and Thread share the 2.4 GHz spectrum with Wi-Fi, plugging a coordinator straight into the computer chassis deafens the receiver, causing dropped sensor events, unresponsive switches, and high packet error rates. Always connect your coordinator through a 1-meter to 1.5-meter shielded USB 2.0 extension cable plugged into a USB 2.0 port.
Step-by-Step Installation: Deploying HAOS on Bare-Metal or Proxmox VE
Depending on whether your Intel mini PC is dedicated exclusively to Home Assistant or serves as a hypervisor, select one of two rock-solid deployment paths.
Method A: Bare-Metal HAOS Flash (The Dedicated Appliance)
- Download the official HAOS x86-64 image (
haos_generic-x86-64-XX.X.img.xz) from the Home Assistant GitHub Releases. - Create an Ubuntu Live USB or clone tool using BalenaEtcher or Rufus.
- Boot your mini PC from the Ubuntu Live USB (select “Try Ubuntu”).
- Open the terminal and identify the target internal NVMe drive using
lsblk(typically/dev/nvme0n1). - Write the compressed image directly to the target drive using
xzcatanddd:
bash

curl -L https://github.com/home-assistant/operating-system/releases/download/12.4/haos_generic-x86-64-12.4.img.xz | xzcat | sudo dd of=/dev/nvme0n1 bs=4M status=progress conv=fsync - Shut down the mini PC, remove the USB thumb drive, enter BIOS, disable Secure Boot, ensure UEFI Boot is active, and power on.
- Within two minutes, HAOS will expand its storage partitions, boot the containers, and broadcast its web portal at
http://homeassistant.local:8123(or via its DHCP IP address).
Method B: Virtualized on Proxmox VE 8 (The Home Lab Sweet Spot)
If you run Proxmox VE on your mini PC, you can run Home Assistant in an isolated KVM virtual machine while keeping host resources free for other services:
- Open the Proxmox VE web GUI and click on your host node shell.
- Run the trusted community Proxmox VE helper script:
bash

bash -c "$(wget -qLO - https://github.com/tteck/proxmox-helper-scripts/raw/main/vm/haos-vm.sh)" - Follow the interactive prompts: choose the default VM ID, allocate 2 to 4 virtual CPU cores, 4 GB to 8 GB of RAM, and select your fast NVMe storage pool.
- Pass through your USB coordinator dongle: navigate to VM -> Hardware -> Add -> USB Device -> Use USB Vendor/Device ID, and select your Sonoff or Silicon Labs adapter.
- Start the virtual machine. HAOS boots immediately with full hardware passthrough, instant snapshot capability, and zero performance loss.
Home Assistant in the Ham Radio Shack: Practical Automation Ideas
For amateur radio operators, Home Assistant is far more than a gadget for turning on living room lights. It’s an industrial-strength station controller.
┌──────────────────────────────────────────────────────────────────────────────────────────────────┐
│                            SHACK AUTOMATION CONTROL ARCHITECTURE                                 │
├──────────────────────────────────────────────────────────────────────────────────────────────────┤
│                                                                                                  │
│  [ Environmental Sensors ] ──Zigbee──► [ Home Assistant Automation Core ]                       │
│  - Temperature / Humidity              │                                                         │
│  - RF Sniffer & Current draw           ├─► Power Sequencer: DC PSUs ON ──► Rig ON (Delay 3s)     │
│                                        │                                                         │
│  [ Victron Solar / SmartShunt ]        ├─► Linear Amp Sequencer: Blower Cooldown 180s on Off     │
│  - Battery State of Charge (SOC) ──────┤                                                         │
│  - Real-time Amperage & Float          ├─► High SWR / High Temp: Automatic Rig Interlock Cutout  │
│                                        │                                                         │
│  [ Lightning Radar Detector ]          └─► Automated Relay Matrix: Drop Antennas to Ground       │
│  - AS3935 I2C / ESPHome ───────────────►   when strikes detected within 15 km                    │
│                                                                                                  │
└──────────────────────────────────────────────────────────────────────────────────────────────────┘
Here are six high-impact automations running in modern amateur radio shacks:
1. Smart Power Sequencing for Transceivers and Linear Amplifiers
Turning on high-power radio gear requires disciplined sequencing to prevent inrush current spikes. Using DIN-rail Shelly Pro smart relays or Sonoff POW switches, Home Assistant automates the sequence:
* Shack Master Switch ON: Powers on LED bench lights, 12V auxiliary gear, and 13.8V linear power supplies.
* 3-Second Delay: Transceiver power circuits engage.
* Master Switch OFF: Shuts down transceivers first, keeps linear amplifier cooling blowers running for an automated 180-second cooldown window, and finally cuts primary AC mains.
2. High-Duty Cycle Energy and Thermal Monitoring
Digital modes like FT8, JS8Call, and VarAC transmit continuous high-duty carriers. A Shelly Plus 1PM on your main 13.8V or 28V DC supply tracks real-time wattage. You can write an automation that fires a Telegram notification or flashes a red LED indicator if shack ambient temperature exceeds 35 degrees Celsius while transmit current stays continuous for more than 10 minutes.
3. ESPHome-Powered Remote Antenna Switch & Rotator Telemetry
Using a $5 ESP32 board flashed with ESPHome, you can control an 8-position relay matrix connected to your coaxial antenna switch. Home Assistant binds your antenna selection directly to your transceivers via the Hamlib rigctld integration. When your rig changes from 20 meters to 40 meters, Home Assistant switches the coaxial relay automatically.
4. Off-Grid Solar & Battery Bank Telemetry
Connect a Victron Energy SmartShunt or MPPT charge controller to Home Assistant using a VE.Direct USB cable. You get instant real-time visibility into battery state of charge (SOC), solar harvesting wattage, voltage sag during 100-Watt voice peaks, and estimated runtime remaining during field day operations.
5. Automated Lightning Isolation Interlock
Using an Austrian Microsystems AS3935 Franklin Lightning Sensor connected to an ESP32 micro-controller running ESPHome, Home Assistant tracks lightning strikes and estimated distance up to 40 kilometers away. An automation triggers a heavy-duty vacuum relay or contactor to disconnect your antenna feedlines and ground tower towers whenever strikes are detected within 15 kilometers.
6. APRS & Weather Station Integration
Home Assistant ingests local weather station telemetry (via WeeWX or MQTT) and can bridge station environmental metrics straight to your local APRS iGate or digipeater beacon status line.
Post-Installation Best Practices: Storage, Backups, and Secure Remote Access
Once your instance is up and running, implement these three operational rules to prevent downtime:
1. Optimize Your Database with Recorder Filters
By default, Home Assistant writes state changes for every single entity into its SQLite database. High-frequency sensors (such as CPU usage monitors, network ping latency, and raw RF power telemetry) will bloat your database by gigabytes every month.
Edit your configuration.yaml file to exclude noisy, non-critical metrics:
recorder:
  purge_keep_days: 10
  auto_purge: true
  exclude:
    domains:
      - sun
      - weather
    entity_globs:
      - sensor.system_monitor_*
      - sensor.speedtest_*
2. Automated Off-Site Backups
Install the Home Assistant Google Drive Backup add-on (or use native network storage backup to a local Synology/TrueNAS box over Samba). Configure it to retain four rolling weekly snapshots and two daily backups. If your mini PC hardware ever suffers physical damage, you can restore your entire smart home-including all Zigbee device pairings and automations-in under 10 minutes on replacement hardware.
3. Secure Remote Access Without Port Forwarding
Never open port 8123 on your home router directly to the internet. Exposing raw web interfaces invites automated botnet attacks, brute-force credential stuffing, and unauthenticated vulnerability probes.
Instead, select one of these secure access methods:
- Cloudflare Tunnel (
cloudflared): Run the Cloudflare Tunnel add-on inside Home Assistant. It creates an outbound encrypted tunnel to Cloudflare edge servers. You can add Cloudflare Zero Trust access policies (such as one-time PIN emails or hardware security keys) in front of your domain without opening a single incoming firewall port. - Tailscale or WireGuard: Connect your smartphone, laptop, and Home Assistant instance to a private WireGuard-encrypted mesh network. Zero public internet exposure, instant access from anywhere.
- Nabu Casa (Home Assistant Cloud): A simple $6.50/month subscription that provides one-click encrypted remote access while directly funding Paulus Schoutsen and the full-time open-source development team.
Frequently Asked Questions (FAQ)
What is the easiest way to install Home Assistant?
The easiest and most reliable method is installing Home Assistant Operating System (HAOS) directly on a dedicated x86 mini PC (such as an Intel N100) or deploying it as a pre-configured virtual machine inside Proxmox VE using community helper scripts.
Can I run Home Assistant on a micro-SD card?
You shouldn’t run Home Assistant on a micro-SD card for production systems. Constant database write cycles from sensors and event states degrade consumer flash memory quickly, typically causing corrupted files and boot failures within 6 to 18 months.
Why is an Intel N100 mini PC better than a Raspberry Pi?
An Intel N100 mini PC provides superior quad-core compute speed, built-in M.2 NVMe SSD storage, upgradeable RAM, hardware video acceleration for camera streams, and low 6W idle power consumption at a total cost that rivals a complete Raspberry Pi 5 kit.
Can I install Home Assistant on a remote cloud VPS?
Installing Home Assistant on a remote VPS is impractical. Cloud hosts lack local network access for mDNS and SSDP device discovery, can’t host local USB Zigbee or Z-Wave dongles, and fail completely during home internet outages, defeating the local-first philosophy.
What is the difference between Zigbee and Wi-Fi smart devices?
Zigbee devices communicate over a low-power, local self-healing mesh network managed by a dedicated USB coordinator, leaving your home Wi-Fi uncluttered. Wi-Fi devices connect directly to your router, consume more power, and frequently rely on proprietary cloud servers.
Sources and Further Reading
- Official Home Assistant Documentation
- Home Assistant Operating System Releases (GitHub)
- Home Assistant Proxmox VE Helper Scripts
- Zigbee2MQTT Project & Supported Devices
- ESPHome Firmware Documentation
- Silicon Labs / Texas Instruments Zigbee 3.0 Coordinator Architecture
- Cloudflare Zero Trust & Tunnel Integration
73 de 9M2PJU


Post Comment